
Ahoy there all ye blogging mates! I'll be downright honest with you folks here. I wasn't exactly sure about what should I do for a DIY post today since I am a university teenager and out of the two weekend days, one goes for the study jazz, so I have one day to wrap a whole DIY post including the text, the photo-styling and actually uploading it. You get the gist right?
So for those of you newbies out there or even those of us who periodically get stuck in a blogging rut, here's a breath of fresh air!
What is... the anatomy of a stunner DIY post?
( DISCLAIMER: This is a long post full of valuable information, so you may want to settle down with a giant chocolate chip cookie to munch on)

You know how you get a colossal volcano of ideas pouring out of your head just before you try to get some shuteye? This happened to me last night. Today morning, I whipped out my notebook and started scribbling these bucket-load of ideas and here they are, actually legible (because my handwriting looks like a infant's scribble when I'm writing on the flow)
1. Cook up headlines you know you can't resist reading...but..
I mean how many times do you get sucked into a post after you read the post title? Maybe posts like "How to have instantly glowy skin with this 3$ trick" or even titles which seem contrary, almost impossible which offer readers solutions like "Stay at home and get paid more than your current job! Here's how!"
Now here's the catch, these titles kind of stand like the hook of first-time-impressioners. Readers get hypnotized by your title and click through, great, then what? If the content doesn't deliver, then your audience are going to feel deceived. So this advice stands sound when you know you have a gorgeous post planned out, make sure you give it a headline that screams "Click Me! Click, Click, Click!" You don't wanna ruin you real estate space by writing some dull headline and nobody clicks to ever get to know a charming post was hiding underneath. That's just...painful.
2.Think outside the box? (NOT!)
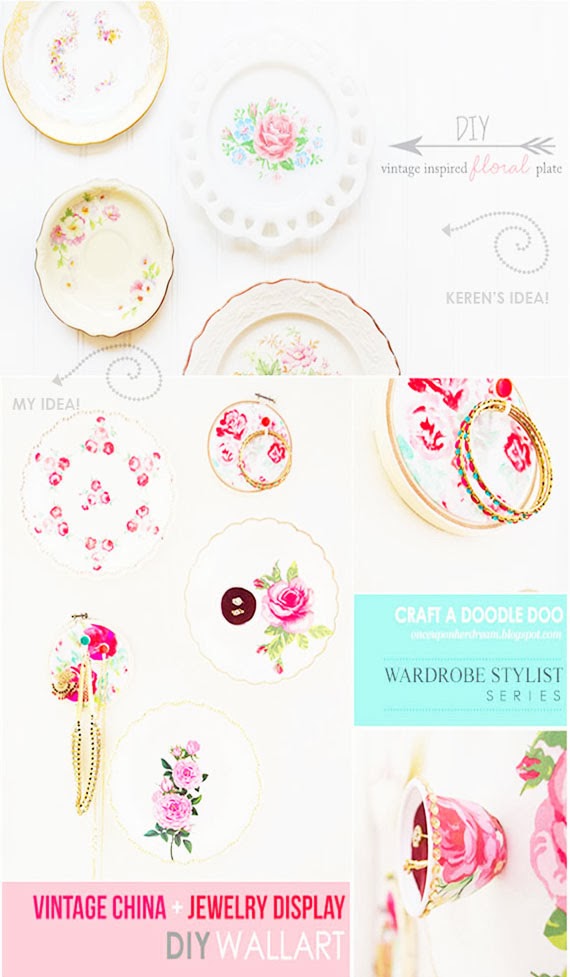
This might be like a slap in the face because you've been told otherwise but you don't have to be a 100% original. Read that again. Yep. That's because there is word in the dictionary called inspiration. Everything is inspired by everything else around the world. Don't drive yourself nuts thinking of something wildly original. My policy? I take an idea, which forms my basic point of pick-up to my own creation. A good example is my DIY Faux Vintage China Jewelry Display.
So ease out your head a bit! Don't think outside the box, shun out the box in the first place!
3.Writing Your Content is like playing a game!
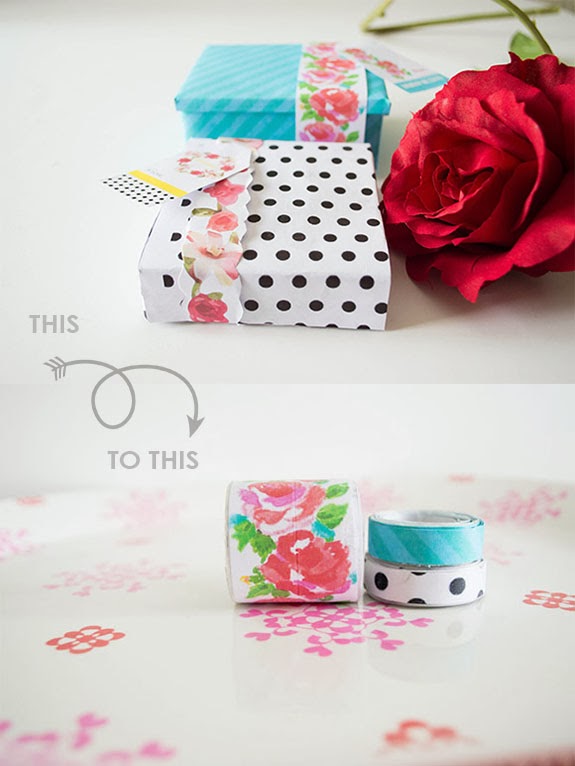
Apart from sharing your super-cool idea with your readers, what else do you write a particular post for? As a lead to other posts of course! So make sure you use a lot of links within your posts to your other posts. I'm not talking about baseless linking like writing a post about burritos and linking about a furniture makeover post inside. That's plain awkward and way too random. The best tip for in-text linking is when your current post completely relates deeply to another post. For example, my DIY washi tape post links to my free printable Giftwrap post because I used the leftover giftwrap to make some snazzy home-made washi tape. This indirectly gives the readers the better hint that the author is actually utilizing all the things he/she makes!
Another great tip is to get behind the scenes. Make sure your pictures are decent tho'. Some of us bloggers (read : ME!) go all messy when we wear our crafty pants and all that's there in the background photos is some crap. When readers see the behind the scenes photos, it backs up all your arguments about the craft you're talking about and you gain your audience's trust. Plus, it's so much fun!
Tip number three is: Don't forget to get embarrassed! Share your craft fails and how you corrected them. It gives the readers insight into any modifications they would like to put in your craft when re-creating it themselves. Plus, it makes you sound more relatable, cuz, c'mon, who doesn't mess things up once in a while? I did this in my DIY cross-stitch wallart post. It was a learning curve in the post for me where I tell my story of how hopelessly the idea began but turned out great in the end! (I later came across a forum where two lovely women were discussing how they liked reading my humorous craft fail story, lol)

The basic essence of a Bomber or a Blah DIY post is this: a blah one is your regular DIY post, it blends in with 1000s others out there. ( I won't disregard these types though because we still have something to learn from them). A bomber one meanwhile is a regular DIY post too, but with a plot twist.
Yep, a plot twist. Like this one, DIY ribbon-tie-vanity basket. It hooks the readers. This basket is your regular basket except that the idea is to make it by recycling cereal boxes. It was favorited a lot at Craftgawker. I've noticed that everytime I do posts like these (and you as self-respecting DIY-er should too), the like rate is beautiful. ^_^. Every. Darn. Time.

4. Be yourself? Here's why this seen-everywhere advice is confusing!
So I've seen this in countless other blogging advice posts"Be yourself while you're writing. Be authentic", yaada yaada yaada. I do agree, BUT here's something for the newbies or for those who aren't getting much meaningful compliments on their posts- they don't know what being themselves means.
Let me explain. I'm sure this happens to you guys too but sometimes in conversations when you need to explain to people why you're interesting or what is the IT thing about you, you're blank. When they ask you about your life, for a sec there you think, it's my life so why isn't my tongue running loose? It's because you can't actually point a finger. So how exactly do you know what makes you unique?
There are two ways I found out, one would be asking people with honest opinions (stick to family members only if they are giving you the stark truth). Do a lot of people say you make them giggle.?Then you do great humor! Do they say that you can shake up a few heartstrings? You're great at moving people's hearts or even convincing them!
Another way is to find out what kind/style of writing you're most drawn to. You're probably best at writing that style too. Because the kind of books that you read a lot are probably the kind you'll be best writing at!
5. Ruthlessly perfect photography?
So you're crushing on a LOT of blogs which have that perfect photography that makes your eyes go starry? A lot of people think I've taken photography courses but that's miles from the truth. I haven't and mostly it was trial and error. I didn't read any of those 100000000 photography tips on so many blogs either. Sure, I pin them and they are useful for fabulous snaps, but with the hectic schedule I don't get around to reading them and a lot of it is probably overlapping when I sometimes skim through them.
Here's the deal for the beginners. No DSLR required. Might sound so dumb since I have one myself but that was gifted to me when I never had a blog (not to make you jealous!). There are a few techniques which make your pictures instantly better without you having to worry about a 1000 things.
Here's a few:
1. For beginners, white backgrounds are THE thing. You don't have to perfect the photo backdrop this way. They look professional, give focus on your craft and are easy to edit in editing programs.
The DIY Floral Belt made from Sharpies is from of my earliest posts. :)

2. Keep a mood/ theme in mind. By theme I mean, think of a color palette for your craft's composition. If your craft is say, a pink and blue bracelet, a good prop for it would be it coming out of a similar blue pouch or gold (for contrast) blurred up in the background.

Mood is like the same thing. When you have a mood in mind, it's zero trouble to take a beautiful snap. For eg, the mood I wanted to create here for my brownies was a tea-party. All the trays, flowers and teacups had to remind the viewer of a beautiful tea-party so I had that particular vintage-reminiscent arrangement.
3.When you're a pro, sure, go ahead, experiment. When you're a starter, don't. When it comes to lighting, please stick to daylight. It will bring out your pictures gorgeously. And use very, very soft sunlight. The worst of cameras take crisp pictures in daylight and the colors look amazing.
4.Embrace technology. After following the above tips, just use any photo editor (if not on your PC, there are so many apps out there now), edit your clicks for minor modifications and upload!
I'll be doing a detailed photography post soon where hopefully, the tips won't overlap with those on other blogs! Watch out for that!
Also consider mixing up different sizes of pictures in your blog post. I'd recommend those that fit your blogroll's width perfectly, square ones (for sites such as craftgawker and google+) and those whose length is larger than the width (which fare best on pinterest)
6.Pretend you're a pro at typography
Because let's be serious. we as bloggers are very important people. To give people the idea that you're not a 4th grader who clashes colors with colors, whips out fonts of every shape and size on one piece of paper, here's a formula for you guys:
Use fancy fonts-plain fonts combination ONLY on Head titles or pictures. For the rest please, please use the plainest font out there (by plain I mean, it's easy on the eyes).
Call-to-actions deserve special attention though. To emphasize them take the same font of your paragraphs and go italic instead. Or go bold but use a one shade lighter (grey instead of black) so it's still easy on the eyes.
I go a step ahead and use dotted lines before and after my call-to-actions to make them stand out!
7.Spacing!
This is more of a personal choice but I've figured that this is what works for me. I normally take LOTS of pictures of the final product of my DIY, so what I do is spread them out a bit and show some of the final result pictures just after the intro (so people have an idea of what this process is gonna end up like) and most at the end of the post so everyone can take in lots of eye candy!
I also do more spacing between different "segments" of the DIY. For example : introduction before the main picture, materials as another segment, the actual process as the next segment and the final call-to-action as an ending segment.
8 What if I don't know what to DIY?
Constrain Yourself!
Here's where we all go bonkers right? One essential thing I learnt all this time is that you have to constrain yourself like crazy. That means the materials/methods you need to make a certain craft should be narrowed down as much as possible. This pushes you to think of new ways to make something and also inspires many genius contraptions! Here's one I did, I have no idea why it became so popular. It just came to me out of no-where, you may want to check how I made it: DIY Bracelet Tower!

Or my vanity tray made from something as basic as a shoebox lid!

Keep no limits!
This would be the exact opposite of constraining yourself. What you need to keep in mind is do either of the do but never, ever be mediocre and go mainstream (exceptions coming in the next main point.) People made chandeliers out of bottle caps. How did they do that? They kept no limit to the materials they needed for the craft! (Heart :Hmm, can I use bottle caps instead of pretty ornaments? Head :Sure!) Here's one example of my DIY in-door style closet organizer, too, incidentally made from bottle caps. Another blogger rejected it for a guest post saying the idea wasn't good enough, but it is the most popular pin on my blog's board at Pinterest right now!

Shop inspiration from online stores!
Great for fashion bloggers! Online retail stores don't just sell jaw-dropping pieces. There's loads of inspiration to knock-off too, so bookmark those little guys!
9. Striking a balance!
A lot of bloggers out there say that you should stick to what you love. And then there's the other bloggy side which says you should stick to posts which you think people would prefer. What do you do? One way I sorted out this problem is by being interested in a bit of everything. I do mainly craft DIYs, style and recipes here but not much makeup. However, I'm still interested in it which is why I ended up doing a post on this DIY concealer and it's the most popular search keyword people come to my blog through! I suppose a lot of chics digged that! So that was an example of people loving my post in a category I'm not a fan of as big as other things!

However. this is something I love obsessively. Vintage florals! So I did a collection on this and it was a hit too! So the point is, juggle between both kinds!

Another great tip is that if you are doing an in-between post, give out something free to download at the end. This also makes people stick around your blog more!
I do this in my making Floral Prints post, where I taught how you can use something as basic as Paint software to make custom giftwrap, fabric or wallpaper and then I give out a freebie at the end!

Secondly, remember when I said never-ever go mainstream? (it leads to tons of traffic too!) Sometimes, when something is a rage and on-trend, do your version of it BUT make sure it has something that sets it apart. When the envelope clutch was taking the universe was by storm, I did my own version of this DIY envelope clutch but I whipped it out of a cushion cover unlike other blogs. Some blogs did it out of a placemat or a fancy rug and I loved their ideas too!

10. Are they gonna remember you?
One of the things I see an explosion of these days is white background at the back of blogs. While I love this and the professional feel it gives (couples with amazing photographs which white backgrounds make pop!), there's so many similar ones now that I forget the face behind each blog! So make sure that you have something "significantly" different on your blog. My initiative for this was to start using picture collages for my main picture (like the first picture in this post.)
Extras:
-If you still run out of DIY ideas, go into the past! Ask your granny or other experienced people how they used to do stuff "back then". You'll never know what tricks they had up their sleeves which have been forgotten down the line!
-Do from-scratch posts and never-been-there posts! When Cath Kidston's pretty fabric was too expensive for me, I got inspired and did a version myself.

When I couldn't find vintage floral freebies that I loved anywhere on the internet, I learnt photoshop and created some for myself initially then thought of giving them out to you guys too! Link for them here! (I apologize for the tons of "I"s in this post, I'm not sure if it's looking rude :) )

-Don't just link to your posts; link to other bloggers' posts as well. If there is a technique you did to make a DIY which was borrowed from another blogger, let people know!
-Readers LOVE it when you give them alternatives; cuz' sometimes they don't have/can't find the materials you use for your crafts...so if you write a bunch of substitutes in the end, you'll win them all the more! For my post on DIY storage solutions, I'd painted one box with vintage flowers and wrapped a decorative sheet on another one but I also include other things people can do to spice up their storage :)

-Take cue from people. Ask on your fb page or post a picture of your idea on instagram and ask people if they'd like a DIY on that. If the reactions is positive, go ahead!
------------------------------------------------------------------------
I hope this post helped you guys lots and was helpful to you! Do pin this piece of advice and pass it on to other blogger pals you know to help them through!
Subscribe to Craft A Doodle Doo or join in the fun on my Pinterest & Facebook page to get free upadates! You can now fill in some tingly fresh lemonade and enjoy the rest of my DIYs here!
------------------------------------------------------------------------
Much love and all the best,
Nash
Thanks Nash!! That was a great and inspiring post!!
ReplyDeleteSan
Aw, you're welcome, so happy you liked it :)
ReplyDeletelove love i love this , i am inspired, but too lazy to execute any of my inspirational ideas :P
ReplyDeleteDarn Sadaf, you never fail to land me in giggles! LOL
ReplyDeleteWow- great thoughts! I am really inspired to make my posts a little better using some of these ideas! Thanks for the inspiration!
ReplyDeleteEpic to hear your feedback Valerie, all the best! ^_^
DeleteGreat post! I actually did ask my mom and grandma what kind of craft they did back then. Some are really inspiring! :D
ReplyDeleteI know! You can never guess the kinda genius stuff they'd come up with! :)
ReplyDeleteThose are some pretty great points. I think even the seasoned veterans get stuck. It happens to most bloggers. Loved reading these.
ReplyDeleteI'm glad they sparked your interest Sharon, and thankyou so much! :)
ReplyDelete