
Custom cards, custom giftwrap, custom wall decals, custom fabric...whaaa?? Maybe it's not as tough as it sounds. Maybe that software which you thought was for kids to doodle on isn't all you made it out to be. Enter Paint. Today we are gonna use this seemingly humble guy to make some fabulous floral prints, ready to be printed on well, about anything! Shall we get adventurous dahlin'?


Imagine lovely floral patterns like these to make your own fabric clutches or beautiful pencil pouches. Or imagine adorable journal cards sitting on your desk. All in any color you want. I'm going to show you how to get your designs on fabric at the end of the post!
Let's get right into it. This works for Windows OS. All you need is the Paint editing program which is by default installed on all Windows OS. I've never used Mac, but if you have a software of that kind on Mac, then it would be pretty much the same I guess!
...........................................
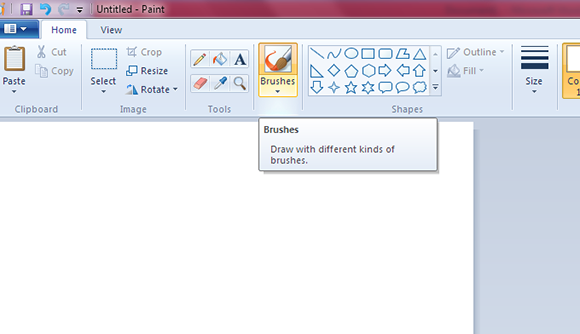
1.Open your Paint Program and from the brushes category, choose the first brush in the second row. (oil brush)This has a tad of a translucent watercolor effect. For the size of the paintbrush, choose the second thickness from the drop down menu.
2.Choose your desired color. I chose a light baby pink, and begin drawing a flower. Don't worry about being too precise, because that's where the beauty comes from!
3. Use a darker shade in the same color range and paint on a smaller flower in the middle. Then add a center in a preferably contrasting color!
Switch to the pencil icon and for the size select the second smallest width to scatter dots all around the center!
4. Use the same technique of alternating between dark and light colors for the flowers keeping your scheme between 2-3 colors for visual interest and choosing a contrasting color for a POP!
5.Complete your doodle by adding leaves of varying length and varying shades. Pull doodles out of your imagination. As long as you stick to your color scheme, anything works, anything goes hon'! You can make out my color scheme consists mainly of pinky shades n'powder blue shades for the flowers , leafy n' woody green for the stems and pops of yellow just as tiny accents!
This step is optional if you know basic photoshop or other editing programs, you can add a background. I chose pale yellow stripes cuz' it's still summer here and it's so cheery!
I printed this design out to use as an card for a giveaway goodie basket I'm designing for a good friend!
And this is the tag I made for the goodie basket with her brand's name. The theme of the goodie basket is centered around DIYing everything. I'm so glad I get to work my crafty soul off on this project. If you do giveaways on your blog, you may wanna check out how to whip up a stunning gift basket for the winner in the next tut!
To do something similar, just download a chalkboard background and open it up and Paint. Then follow the rest of the steps!
Don't miss out on the next tut which shows you how to Handcraft a Gift Basket for your giveaways!
Check out other crazy cute DIYs here!
.............................................
Follow me on Pinterest and Facebook for truckloads more inspiration waiting in store for you or become a subscriber to have the fun delivered right into your mail!
.............................................
xoxoxoxoxoxoxox, Nash!
READ : To print out your designs on fabric and wall decals head over to spoonflower.com who can take your designs and print 'em out in any measure for you!
(Download the chalkboard gift tags here!)
Psst...Here is a super-pinnable image of the whole journey you just had with me!
You make it look so simple! For some reason, I can't seem to control the "brush" on paint and end up having to erase lines that go off in the wrong direction. You have inspired me to practice! Thank you. {smile}
ReplyDeletedani
I know it can be a wee tough if you haven't been doing it for a long time, but like you said practice makes perfect, I promise ! :)
ReplyDeleteAWEsome! Thank you
ReplyDeleteThankyouuuuuu Pearl :)
DeleteWow, looks great. Wonderful idea.
ReplyDeleteWish you a wonderful sunday.
Agnes (little.empty.room)
Thankyou Agnes, hope you give it a try! :)
ReplyDeleteI always wanted to use paint for something useful instead of just playing around with it! You certainly make the flowers seem doable. Definitely going to try this soon. Love the two pencils in the pictures as well (I'm a decorative pencil junkie/collector). :)
ReplyDeletetheurbancurio.blogspot.com
They can be a lil tricky at first but a little hint is to zoom in a bit while you're drawing so there's less chance of any wayward strokes! :) And oh yes, the pencils are simply regular ones dressed up with washi tape :)
ReplyDeleteInspire by your this post...I drew almost the same artwork on my artbook....I love the yellow stripe background...
ReplyDeleteThanks for sharing !!! Id love more diy on drawing girly flowers and stuff!! JazakhAllah khair
San
Thank you so much Sania! :)
ReplyDeleteAnd of course, do look out for more girly tuts and such on that! :)