Saturday, March 29, 2014

INSPIRATION NATION// DIY STAMPS!


I'll ask this straight, are you up for some fabulous textile printing? ;)


Call me nuts, but I see a lot of potential in bottle caps. "Bottle caps, yep you're crazy!". Let's just date back and take a look at the in-door style closet organizer I made using bottle caps. It's still sturdy and rocking my wardrobe today, and let's not forget these come for free! So what else can you exploit these for? DIY Stamps of course! Stamps are for babies, you say.Maybe they were, but today let's make a rebel out of ourselves, shall we? :D


You'll need:

Bottle caps, lots of them!
Craft Foam (plain or patterned)
Super-strong craft glue
Stamp pads/Paint
A scissors and a pencil
Washi Tape (optional)


How-To:

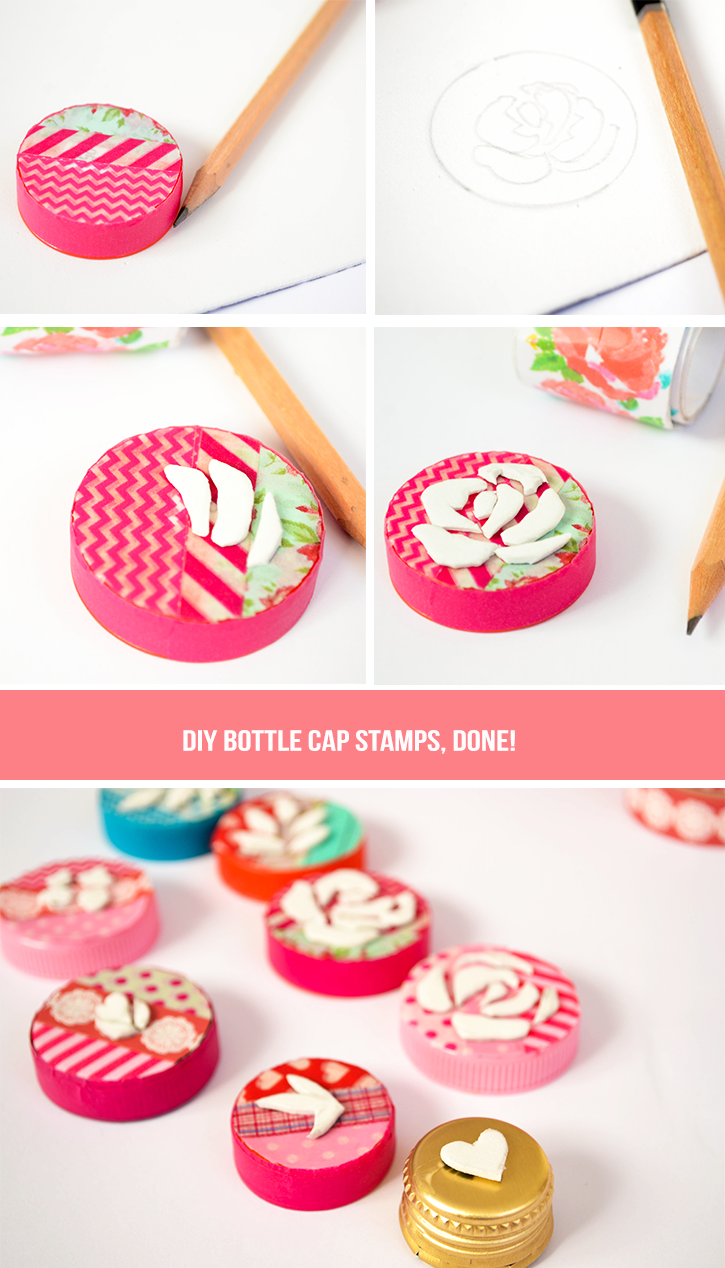
1.If you'd like your stamps to look extra cute washi tape the tops first. Of course you don't need to do this, it's just one of the perks of being excessively girly.


2. Trace around the bottle cap's circumference with a pencil to determine how much area you have to draw and doodle any shape inside. I just made me an entire botanical set, so I began with a rose. If you need, you can have a template or anything of the kind for reference. :)

3.Cut out the shape you drew and glue it down onto the cap.

4.Grab your stamp pads, or paint (I used acrylic paints) and begin stamping away. I just used a pretty satin napkin to put my pattern on.
Tip: If you're using paint, it can be a tad difficult, so just make sure that:
       - You have a nice, even coat of paint on the stamp shape.
       - Make the paint a bit diluted (using water) so it's smooth and not gunky because
       that'll make the designs, uhhhh...weird.
5. Be awesome and make yourself a cup of tea! (or coffee if you're a coffee person. I'm more of a tea + iced coffee girl, I don't know why I typed that here.I know it isn't even irrelevant)

I poured myself some hot cardamom tea in a cute mug and my pretty new napkin to cheer me up. It's the little things that give me glee.

Here's a close up of the print. Don't they look pretty? How about making ombre patterns now? I think that's what these lil guys will do next.


Liked these idea? Pin it, sweetheart (cuz' sharing is hot)
......
In the meanwhile, come join me at Pinterest and Facebook or subscribe to Craft A Doodle Doo if you'd like to get updated on loads more DIYs!
......

A million hugs,
Nash

(PS #1: Need another textile design tutorial? This Cath Kidston inspired print tut may just bowl you over! Or check out other DIYs in my DIY Gallery!)
(PS #2: I apologize for the changing blog design, but I'm trying to get a hang of how I want it look eventually. Yes, I'm indecisive.)


Thursday, March 27, 2014

PRETTY ME UP// DIY BEJEWELED HEADBAND!

This is the first rich crafty goodness I churned out for Cut Out+Keep on their Crafty Superstar feature! It's a uber-luxe bejeweled headband and looks so sophisticated at the same time. ( because we know that not everyone fancies OTT things). Looking to perk up a plain outfit?
I bet  this'll do the job!


Just corral your broken jewelry and random beads. (or maybe have some old dresses that you never wore because they were too sparkly for your taste? Switch the sparkle to your hair instead!) Your locks deserve that extra pampering,don't they?

If you already have a crazy assortment of beads and gems on hand, you're good to go!
See the full tutorial I made for them here! or


And if you're gifting it to a friend (like me!) then add it in a small pretty sachet for her to keep in! ( I just made mine out of some satin scraps and a fabric tape gift tag!)

You can check out another super-pretty headband tut here or more accessories to pump up your wardrobe in my DIY Gallery!
.............
Meanwhile, hop over to my Pinterest and Facebook to follow for hot new DIYs + become a subscriber! (I know we all wanna look gorgeous for frugal!)
............
Take care, (Don't forget to pin and share with your friends!)
Nash

Friday, March 21, 2014

INSPIRATION NATION//DESIGN YOUR OWN BLOG! (And a FAB one at that!)

I must confess, I've become disillusioned with my newest obsession, blog designing! Now I've never really designed anyone's blog per se (just a few tips and tweaks for other friends), but I think I'm kind of fancying the blog design bandwagon! So today, I'll let you download a super-easy tutorial on how you can design your own blog (on Blogger, works for Wordpress too) and I'll give you all the blog design elements I designed in this tutorial for free!
     Seatbelt on girls!
I'm honestly head over heels for this one, so much that I feel like switching like my own blog design to the one in this tut, but I'm still in the process of primping up my own. ;)

I used Photoshop CS6 for this tutorial (the version doesn't really matter though) but if you're good at other online editing apps like picmonkey and pixlr then you can probably use those too. Isn't is nice when everything is so versatile?

The blog elements include the header, the fonts, social media icons and the navigation tabs. The above is a screenshot for you to see how they all look like after put together. Such a happy family!
The zip file I put for download include the pdf file which lists the detailed tutorial as well as the individual design elements to upload onto a basic blog template.

Header:
Every blog needs a whopper of a header. It's the first thing that makes those eyeballs stay put on your blog or else close the window pronto! Here's how I made mine and you can make yours too. Begin by thinking of a theme. I love fresh. pretty colors and it's Spring too, so I grabbed this image from Pinterest for reference and began painting away.

Hand-drawn doodles or painted designs are so much the chic trend now and they really give that casual+professional feel to a blog. Here are the steps:

We now import the image in photoshop (it can be a scanned file from your printer or a photograph you took, I used the photograph) and continue with the editing to create our pretty blog banner.

You can see the rest of the steps in the pdf file because the post will run incredibly large if I do post everything over here. (Yes, Nash you say, please don't force us to read your long drawl-y posts!)

A nice way to give your blog a super-polished look is to choose colors with a contrast. Use a few colors from one part of the spectrum and then choose a few colors from a contrasting range of the spectrum. Like, me being me, used a rage of hot pink to pale pink petals to add a feminine pop of color in the header, and a lot of gender neutral blues and greens to give a beautiful contrast. Of course, if you like, you can still make it all your favorite color, but I just think having a palette adds so much more visual interest!

The best part? You don't even need to be a good painter. Posing as one will do (I do the same!)

Fonts:

Fonts make up so much of the blog's readability. Fonts look great paired with contrasts too (Sans serif with serif. Plain fonts with calligraphic. Serious fonts with playful, handwritten ones). Whenever you'd like to use a fancy font, make sure you use it where you need a large font size. Generally, fancy fonts are difficult to read when they are small-sized. Stick to the very basic of fonts for large chunks of writing, because they are more readable and pleasant.

See all the font-mantra I just mentioned down below. The blog title has been written in a calligraphic font (I list the fonts names in the downloadable tutorial file). The tagline for the blog is written in a simplistic font. It helps the fancy calligraphic font pop even more!

Textures and Patterns:

While you can use a multiple of patterns and textures, make sure that you either
1) Use a focal design on one area of the blog and keep the rest minimal or
2) Use a variation of textures on different areas while making sure they all tie up perfectly well together (Usually making everything look unified goes back to the colors you used.)

Obviously the second choice is more difficult to follow through. For this blog design I kept the background completely plain but you can use a very minimal background too and it would still look great.

My rule of the thumb for the perfect laid back+professional design is this, pair opposites but not to the extremes. For ex, I paired delicate flowers with some geometry(circles)! They are not really opposites but circles usually don't come anywhere near flowers, do they? :)

Social Media Icons and Navigation Tabs:
Since I used the same colors and geometry for the navigation tabs as the header (again to tie everything together), I used an ombre pink for the social media icons.


You can check out how to:

1. Upload a header images to blogger
2.Upload social media icons for blogger
3.Upload navigation tabs in blogger:
To upload navigation tabs, use the same technique as the social media icons but don't upload all the images into one widget but individual widgets and link each to it's url.

Everything includes psd files so they're editable or you can add extras by modifying the existing elements. :)
You can download the whole step-by-step tutorial here.
You can download the whole zip file for the design elements here.

Have any questions? Drop a comment! Or leave a comment on my Pinterest/Instagram/Facebook!
................................

Meanwhile, pin this and share it if you found this useful. *smile*

Check other design resources here

Lots and lots and lots and lots of hugs,
Nash, xoxo

(And oh yes, check how how the blog design looks over here!)


Friday, March 14, 2014

Cravings Ravings//Chicken Biryani (So delicious, nothing compares!)

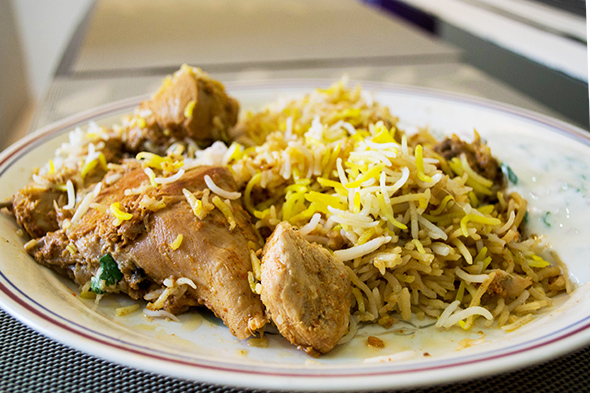
There's good biryani and then there's good biryani. So utterly delicious, that if you're on a diet, it's possibly the worse of obstructions. So let's keep that diet on the backseat for just a day and work up an appetite for this ridiculously tasty aromatic one pot meal, with tender chicken seasoned with a host of flavorful Indian spices and garnished with crisp, gold onions n' fresh herbs.

You'll want to have company while you have a hearty laugh and cozy chats over this one!

They say that making Biryani is a difficult dish to master, but this post outlines the whole process into just three steps. If you follow them to the T, it's a foolproof way to impress those guests. Don't let the ingredients overwhelm you, they pack the delicacy with loads of flavor!


You can find them in the Asian food aisle at the store, just in case they look like a hard find. :)

Hyderabadi Chicken Biryani

Serves: 4-6 people

Steps:
1. Chicken Marination
2. Rice preparation
3. Layering the Biryani

Step 1: Chicken Marination
Ingredients:
1.   Chicken - 1 kg
2.   Onions fried till golden - 1 big cup
3.   Oil - 1/2 cup ( the oil left after frying onions can be used)
4.   Yogurt - 200 g
5.   Ginger garlic paste - 1 1/2 heaped tablespoons
6.   Red chili powder - 1 tsp
7.   Coriander powder - 1/2 tsp
8.   Garam Masala powder - 3/4 tsp
9.   Cardamom powder - 1/2 tsp
10. Cinnamon powder - 1/2 tsp
11. Salt - 3/4 tsp
12. Shah zeera (black cumin seeds) - 1/2 tsp
13.Cinnamon (whole) - 1 inch stick
14. Cloves (whole) - 3 to 4
15. Cardamom (whole) - 3 to 4
16. Green chilies - 3
17. Bay leaves - 1 (optional)
18. mace - 1/4 tsp (crushed,optional)
19. Juice of one big lemon


How-to

1. Keep aside half the quantity of fried onions and mix rest of the ingredients well.
Then add the remaining ingredients and mix lightly.

2. Cover and marinade overnight in a refrigerator. (Make sure you marinate for at least 3-4 hours for proper marination  if you can't do it overnight.)

Step 2- Preparing the rice
Ingredients:
1. Long grained Basmati Rice - 3 cups/500g (wash well and soak in water with a little salt for half an hour)
2. Shah zeera (black cumin) - 1/2 tsp
3. Oil - 2-3 tbsp
4. green chilies - 2
5. cinnamon sticks -Two, 1 inch sticks
6. cloves - 3 to 4
7. green cardamoms - 3 to 4
8. bay leaf (optional) – 1
9. cilantro leaves and mint, chopped - 1/2 cup
10. Salt - 1 tsp
11. Water - 8 cups ( enough to cover 2 inches above the rice level )

How-to :
1. Put water to boil in a large heavy-base cooking pot.

2. Add the Shah zeera (black cumin), cardamom, cinnamon, cloves, bay leaves, cilantro
leaves, mint, green chilies, oil and salt.

3. When the water starts boiling, add rice and cook on high till the water boils again

4. Simmer the rice for 2-3 minutes (so that the rice is cooked up to 70%.)

5. Drain the rice and keep aside.

Step 3: Layering the Biryani
Ingredients:
1. Marinated Chicken Mixture
2. 1/2 cup fried onions reserved earlier + a tablespoon of sliced onions
3. Chopped cilantro and mint leaves - half cup each
4. Green chilies - 2
5. 1/4 tsp crushed Saffron soaked in 1/4 cup warm milk + a pinch of Saffron food coloring
6. Par-boiled rice prepared earlier.
7. 1/4 cup oil mixed with 2-3 tbsp ghee / clarified butter
8. 1/4 cup lemon juice

How-to
1. First arrange the marinated Chicken in a similar heavy-based big pot.

2. Top it with sliced onions and half of the reserved fried onions, cilantro leaves, mint.

3. Spread the par-boiled rice and top it with the remaining fresh herbs, green chilis and the remaining fried onions.

4. Sprinkle on the oil + ghee mixture evenly, lemon juice, and the saffron soaked in milk.

5. Cover the pot with aluminum foil, then the lid and put on high heat for about 5 minutes until you can see steam escaping from the sides of the lid.

6. Now put the pot to simmer on low heat and put the biryani to dum (sealing the lid and cooking on low heat) for 20-25 minutes.

7. Keep changing the position of the base of the pot 2-3 times to provide heat evenly on all sides.

8. Serve topped with the fried onions, cilantro, mint and sliced boiled eggs for the ultimate gratification.

Biryani is often served with raita (seasoned yogurt) or a variety of curries.

You need to try this, no questions; and when you do, let me know how it turned out or mail me a picture! I'd love for you to share it with me!


Check out my step by step tutorial on making mutton biryani too!

Pin this recipe and share it with all the foodies in your life!

Stay happy and have a great weekend,
Nash

PRETTY ME UP//DIY BLOTTING TISSUES+BOBBY PIN HOLDER (ALWAYS FLAUNT A FRESH LOOK!)

This was more of a trial and error routine to get the easiest homemade version of...face blotting tissues! Now if you have a slick nose like mine where you may probably have the reflection of the opposite person casting on it, or slick anything really, these are your saviors!


This is a total travel accessory! Holds bobby pins/little baubles.perfume samples etc. in one compartment and heart-shaped blotting tissues in the other and bang, you're ready to head out! I just used my empty powder compact for this but you can use anything (I just wanted to use those old empty compacts piling up). Plus, it has a mirror, since in historical times it was a makeup accessory. That kills three birds in one stone, doesn't it? I adore DIYs like this!

You'll need:

1. A sturdy empty box (consider mint tins, old jewelry boxes, or even anything from the dollar store that is about palm-size)
2. Fabric/paper scraps (I used pretty vintage-style fabric scraps from my pretty DIY storage project!)
3. Scissors, modpodge (any PVA glue) and a marker
4. Filler paper (the ones you find in shoe boxes/or filled in new bags to puff them up and keep shape) or Normal tissue paper thinned down into very flimsy layers or if you're an architecture student like me, low-quality butter paper is gauzy enough for the purpose!
5. Pretty labels (You can use the free label I made for you!)

How-to:

1.Start by cleaning the compartment of your compact (if you're using a compact that is). I cleaned mine and there was still a lot of pigment embedded in (which wouldn't disappear even with cleaning chemicals), so if yours doesn't - don't fret!

2. Roughly cut your fabric scrap to size the compartment.Apply some modpodge onto the wrong side of the fabric and fit it into the compartment. Smooth out any bubbles, wait for a couple of minutes and then apply another layer on top. Let dry for 3-4 hours.

3. Meanwhile, cut a long strip of the tissue/filler/butter paper and fold it until it's the size of a square that will fit your compartment (kinda like accordion style)

4. Fold it in half again and then draw half a heart (don't heart hearts? Leave as is, or do any other shape! I typically favor hearts/flowers for cutouts :) )

5. Cut out and lapse in the glory of lots of small hearts!. Store them in your compartment!

6. If you've downloaded the label I made, cut it to the size of your lid and then glue down. Apply a thin layer of either matte/gloss modpodge on top to seal everything in place.

7. Throw in some baubles in the other compartment and tuck it in your purse!

And now I face the world with a nose that doesn't bifunction as a mirror!

If you don't have a compact like mine, but one of those round ones, you can either use them for these blotting sheets or bobby pins (or make two- one for each!)

I know the part you're waiting for.....the shine test and here it is! Carefully smooth over the sheet onto the shiny areas while pressing. The picture doesn't quite pull in the actual shine here but I think you get the idea :)

If the shine is melting down your makeup, then make sure that the skin has been well exfoliated and is not bumpy. Makeup settles down in little patchy bumps in areas like such and using a blotting sheet to zap the oil will leave you with gaping huge pores exaggerated with the makeup. Big no!

In cases like these, icing the generally oily areas and then applying a primer helps a long way. (Check out my DIY face primer recipe here, it's impressive!).  Ice helps shrink pores and gives a rosy glow and you can immediately tell the difference. Finish off your makeup by some store-bought or homemade setting spray (glycerine + water or rosewater).
And lastly, a little shine is always a plus, it makes you human, and beautiful so don't go overboard!

Excited? Read this magical foundation meltdown trick with a single ingredient! You'll be surprised PLUS it was recommended by a makeup artist!
.......

For more DIYs, go over my DIY gallery here!

If you liked this DIY, share it with others and pin it! They'll thank you!

XOXO, Nash
(Follow me on Pinterest and Facebook, let's gawk pretty things together! *wink)


Saturday, March 8, 2014

THE DECORISTA CHRONICLES//DIY 3D WALLART INSPIRED BY RIFLE CO.

Wallart again :) Aren't we always looking for some quick low-budget ways to brighten our walls that look droolworthy? Recently I've been getting floored by all the Rifle Co. mixed media art (pretty much dominating my latest likes on Pinterest!) and I think it's so utterly gorgeous! So today, let's recreate some of that on our very own walls and imagine ourselves as Miss Fancy Painting Pants!

Let's take a look at the inspiration for this DIY


I didn't want as much of a botanical overload as in the art above though. (The references to the images are in the end of the post)

Materials:

Fake flowers cut off from the stem's start/Handmade paper flowers*
Scissors, super-glue, a pencil and a ruler
Paints/Sharpies or any other markers that deliver vivid color
An empty, shallow cardboard box/A shadow box

*More on that in step 2

How-to:

1.If you're using a cardboard box like me instead of a shadow box, you'll want to deck it up a bit. I did the outside and inside edges with some mod black and white washi tape to balance all the color to come. (You can also use some metallic gold to do the edges to give more of a luxe look).

Snip off any awkward edges jutting out.

2. I wanted to give more of a handmade effect so I made handmade paper roses by using this template from The Elli Blog. It's absolutely addicting to churn out one fabulous rose after the other!(thanks Lia!)

3.Next, bring on the typography! I used my own handwriting but you can also print out your favorite quote in any font you choose (except Comic Sans, because that's just....comical) and paste it on the base of the box.
(If the base of your box is not white, you can layer it with some white paper or any other coordinating color of choice)

4.Begin playing around with the arrangement. You have two options here, either glue down the roses or draw the botanical stems first . Personally, I'd recommend doing half and half. (wait, that just made it three options.) I drew some of the stems before; this gives a raw idea of where you want the flowers and then added in more leaves like they are popping out from the roses underneath.
Make sure your roses at the base are a tad bit flattish (flat, flatty, flat-ish? Lol) so that they adhere properly. If they are not,snip off a bit of the end so that they are not so pointy, and then dab a generous amount of glue.

5. Add in a few more 2D elements like buds in the same color as that of the roses to unify the whole art. You can add more visual interest by corralling up different objects like buttons and sequins onto the art but I left mine as is since it would look too cluttered up.

And you're done! (If you're looking for even more contrast, use a chalkboard background for the artwork. Splendid any route, I say!)

I'd actually like to share a bit of a cute disaster at the project's beginning. When I was printing the paper rose template in pink, the printer ran out of ink and printed the petals in various colors of pink and of course, the roses turned out even prettier because they looked all the more natural with so many different shades! (Haha, adapting, like a boss)


The larger the surface area of the background, the greater options you have for filling in.
There ya' go. Create one and make your momma proud.(with all respect)
In hindsight, choose as sturdy of cardboard as you can to avoid the slightest of bending.
If you liked this DIY, consider sharing it on Pinterest! Meanwhile, I'm super-excited to tell you that Craft A Doodle Doo will be starting a newsletter. It'll round up on the current month's DIYs and inspiration and the most popular DIY from the previous month + other ideas and tidbits!

In the meantime, 
Surf through more DIY ideas in my gallery!
I apologize for not posting since two weeks straight since I've been literally aping around in between my exams and had to painfully push the blog on the backseat, but I'm back now and will be posting every week or so as usual and to really make it up to you I'll be posting a wonderfully simple DIY and freebies next week, so stay tuned!


And for that you can my friend,
Subscribe to Craft A Doodle Doo or just follow me on Pinterest and Facebook!


Hope to see you soon,
Big, sunny smiles to everyone,
Nash

..............
Links to images on the Inspiration board:
1  2  3  4  5  6  7


FRESH IRRESISTABLE IDEAS...

RIGHT TO YOUR INBOX!

* indicates required

View previous campaigns.