Friday, June 6, 2014

INSPIRATION NATION// ARCHITECTURE PROJECT REVEAL

Second year of Architecture came to such a dizzying end and the cherry on top was what you see right here. Like my last Architecture project: (the complete process of which is photologged here) French Consulate General in an Arab Country, this year's final project was to create a science and discovery museum on category of choice.

I chose an Islamic Art & Culture Museum of course since I'm always so smitten by the complex geometric and botanically intricate mashrabiyyas. 
Craft A Doodle Doo Islamic Art and Culture Museum Proposal #design #architecture

The concept was multi-faceted especially because the Islamic Arab heritage is so rich. While primarily based on the Arabian desert aspects of undulating sand dunes and oasis, the concept was also supposed to represent the up and down graph of the Arab era, of scientific discoveries and inventions which marked its peak, of the birth of Islam, of the depression of the period before literacy in ancient pagan times. The synergy of these ideas led to an edgy, modern form of the building jutting out from the roof, interspersed by skylights to break what would have been an otherwise "heavy" shape and lots of green outdoor areas for lounging in terrace cafes.

Let's start from the entrance,shall we?

The main entrance is dominated by two mashrabiyya canopies (the webbed geometric design is what you call a mashrabiyya, It has plenty of intricate net-like detailing and was used in traditional Arab houses as windows to control humidity, air current and provide privacy).

Craft A Doodle Doo Islamic Art and Culture Museum Proposal #design #architecture

There are all in all four floors to the museum:

Floor 0 : Reception, ticket booths, gift shops, stores, outdoor cafe, office administration A separate staff entrance lies on the right lateral side of the entrance.
Floor 1: Exhibition Floor. Main exhibition. An outdoor exhibition area and two secondary exhibitions.
Floor 2: A theater, an "indoor" amphitheater space. A couple of multipurpose halls
Floor 3: Learning resource center: Library, digital and interactive areas for learning, etc.

Craft A Doodle Doo Islamic Art and Culture Museum Proposal #design #architecture

The lengthy trapezoidal terrace you see covered in lush grass is the outdoor exhibition on the first floor. I hope things are slightly starting to make sense now. (lol)

And oh, this is the seaside elevation (below). The whole outdoor exhibition and cafe lounge (which is the green area on the ground level) faces the Red Sea.

Craft A Doodle Doo Islamic Art and Culture Museum Proposal #design #architecture

The continuity of the triangular mass is seen on the landscaping. The function of the mashrabiyyas here is to serve as shade as well as aesthetic. The perforation allows the visitors to enjoy the sea side view as well.
Craft A Doodle Doo Islamic Art and Culture Museum Proposal #design #architecture
A closer look at the voids and skylights in the roof. The texture was done using parchment paper (Hah!). The mashrabiyyas were done using Autocad of course in a laser-cutting lab especially for students. :D

Craft A Doodle Doo Islamic Art and Culture Museum Proposal #design #architecture

The front elevation of the buildings and the two lateral sides all have the mashrabiyyas but the back side looks a bit different. Like below.

Craft A Doodle Doo Islamic Art and Culture Museum Proposal #design #architecture

Here's the side opposite to the seaward side.(along with the main elevation you see on the left)

Craft A Doodle Doo Islamic Art and Culture Museum Proposal #design #architecture

 And that pretty much sums up the facade of my second year's project!
Craft A Doodle Doo Islamic Art and Culture Museum Proposal #design #architecture

Oh, and tiny little details like this made me feel happier about it!
The pavement work leading to the outdoor exhibition!
Craft A Doodle Doo Islamic Art and Culture Museum Proposal #design #architecture

How did you like it? Lemme know!


Are you a design oriented fellow? Pin this onto your board to bookmark some inspiration!

Check out my DIY gallery for other wholesome DIYs and fun eye candy!

Love,
Nash


Wednesday, June 4, 2014

THE FREEBIE JUBILEE//EUPHORIC DIGITAL PAPER PACK!

Since my floral papers with a vintage twist are the most popular digital paper packs at Craft A Doodle Doo and I've been having lots of requests for commercial use, hence the on the spur decision to actually create a similar paper pack as the earlier ones with a vintage flair!

Go buy the full collection in my shop ....or if you're looking for some instant free gratification, you can test out the mini sample kit from the same collection!

The kit includes 4 delicious papers and 5 adorable gift tags for you to add that final polished touch to all your presents!

Craft A Doodle Doo-Euphoric Vintage Free Digi Pack #free #printables #floral #vintage

And of course, use them as digital graphic to brighten up your web design or as printables to dress up millions of projects, frame them or scrapbook with them, however you use them they'll always make your creations a notch more fab!
Craft A Doodle Doo-Euphoric Vintage Free Digi Pack #free #printables #floral #vintage


And right after the creation of my DIY Notepads, numerous friends asked me if I could whip up some more for them. So here are more, made with the full collection!

The printer ran out of cyan, so it kept printing everything with a pinky tinge. My bad.
Craft A Doodle Doo-Euphoric Vintage Free Digi Pack #free #printables #floral #vintage

Have fun, stay marvelous and don't forget to check out the rest of my Freebies (or if you're a designer, my online Boutique!)

Here's a look at the entire collection. :)


And for the DIY of the notepads, check out my DIY Gallery!

Love,
Nash

Tuesday, June 3, 2014

INSPIRATION NATION// GRAD GIFTS ALERT!

It's all about celebrating incredible futures this month as I wrapped up the best of the best deals for you in a neat pinnable graphic. From inexpensive gifts that are worth far more than their price to moderately priced gifts they will cherish for a long time to come; these gifts range from hers, to him and gender-neutrals for those who aren't that sure what their grads may prefer!

I've also included my own DIYs as well as featured a couple of other talented bloggers because let's just put it straight, everyone's got such droolworthy ideas!

Craft A Doodle Doo-Graduation Gift Guide 2014 #diy #graduation #gift #ideas #graduates #guide

TO DIY:

For her:

1. Set of notepads/ mini journals : Can be used for pasting keepsakes or writing brilliant ideas. These are so easy to make, totally customizable and can be made in many, many numbers!
See the link for DIY Notepads here.

2. DIY Ethinic Envelpe clutch: Which girl doesn't adore a doze of high-end fashion? Get the luxe look with a homemade version now. She'll be delighted!
Get the link for DIY Envelope Clutch here.

3.DIY Botanical Pen Bouquet: Pens or Pencils, this DIY Bouquet for the creative, writeoholic grad will totally light up her workspace and home decor! 
Get the link to the tut here!

For him:

1.Gym-worthy Ipod Holder: It can't get better than this! This easy-to-sew Ipod holder by Design Fixation fits snugly on your arm while you burn those pesky calories!
See the Ipod holder tutorial here!

2.Copper-pipe pencil holder: He'll be super-impressed with this classy industrial-lookin' copper DIY pencil holder by A Fabulous Fete fit to liven up even the plainest of desktops!
See the Pencil Holder tutorial here!

3. DIY Ipad Case: Have a faux animal skin placement mat or something of the likes? It's the shortest cut to make an Ipad Cover for a bit of fashionable protection! Roughly fold in half and fold over the extra onto the initial side securing with velcro like a clutch!

....................

TO BUY:

For her:

1. Floral Cnavas Backpack ($ 26) : Charlotte Ruse really knows how to do summer with this beautifully feminine backpack! Great for summer time trips and effortless style!

2.Rosa Pocket Notebooks ($ 10): If there's any stationery brand that can steal a girl's heart in an instant, it's Rifle Paper Co.! These two pretty notebooks are perfect to jot down memos in style!

Assemble:
3.Neon Nailpolish in Rainbow Sherbet ($3.99) - Best-selling and oh-so-vivid
4.First Blush Eyeshadow Palette ($ 1.99)- Double them up as rosy blushes!
5. Summer Strut Heels ($29.99) -Coral is always in!

from Rue 21 and Style For Less is a pretty package to make a fabulous gift for the summery fashionista!

6. Rue 21 Gift Card : If you'd like her to decide for herself what'd set her heart racing, give her one of these!


For him:

7. Thumbs up UK Fli-Tunes Sound Amplifier. Frisbee ($16.43)  A Flying Disk and sound amplifier for your phone in one? No way! Yes way!

8.IPhone Pocket Projector ($69) This product will be so worth the price to be shelled out! Perfect for travel and has first-rate reviews so you know he'll rave about it as soon as it's put to use!

9. The Inkless Metal Pen ($ 28.00)  No sharpening, never runs out of ink and made of metal. How much more swag can this have?
                    
10.Word. Notebooks,3-pack ($9.99)  Don't guys get swanky ideas too? Let his keep track of to-dos with flair!

...........................

Gender -Neutrals:

1. ITunes Gift Cards ($25, $50, $100) : Include your personal message and give this fanciful card to a very overjoyed recipient!

2. Mosaic Photo Book ($20) : Lets grads stow away their priceless moments and breathtaking photography in a stunning photobook straight from their...phone! Check out the ultra-cool and easy process on the homepage!

3. Treatsie Gourmet Sweet Box Subscription ($29 and above) - Caramel popcorn, Espresso cookies, chocolate truffles, Almond Chocolate Toffee. Who canNOT relish this?

4. Custom Mugs, Shutterfly (Varying Prices)  Got any favorite pics they have while they sip on their cuppa joy? These cutom mugs from Shutterfly are definitely unique. Keep favorite snapshots hand because they're about to create a one-of-a-kind mug!

5. Collage Squares Ipad case ($49.49): Shutterfly is all about versatility so whip out an Ipad case that will be the crowd's envy using your grad's awesome snapshots! They'll treasure it, no questions!

Which one's your favorite?

Let me know!

Lookin' for other DIYs? I have hoards of ideas for you in my DIY Gallery!


Heart this? Show the love and pin it!

Lots of hugs,
Nash

**PS: I'm not sponsoring any of the brands mentioned above not do I have an affiliation program with any of them. All the ideas mentioned above were based solely on personal choice. 


1. 

Friday, May 30, 2014

INSPIRATION NATION//DIY PEN BOUQUET

This is a graduation gift special! A super-fun gift to make and an even more amazing gift to receive. Of course, as always this DIY is extremely versatile so you could easily replace the clay flowers for silk of even crepe paper/fabric flowers or you could use the air dry clay recipe to make other vibrant toppers like a miniature Starbucks coffee mug or some clay high heels to go on top of your pencils/pens. The possibilities are endless!
This DIY Pen Bouquet features some big colorful blooms and since I was topping my pens with florals, I decided to make a whole bouquet of them.
DIY Botanical Pen/Pencil Bouquet as Grad Gifts #diy #ideas #gifts

When your sweet grad girl runs out of ink over time, she could just use them as beautiful decor or even discard the pens and use just the flowers as keepsakes. Probably if she is a crafty soul like you, she may even figure a way to upcycle them!
DIY Botanical Pen/Pencil Bouquet as Grad Gifts #diy #ideas #gifts


I just used a glass vase I'd modpodged with glitter to add some classy glamour and popped the pens in. For an extra realistic effect I stuffed in some leaves spilling out of the jar's rim.

Here's how you can make your own:

Materials:
-A set of pens. I used a pack of six.

-For small quantities of air dry clay:

 Cornstarch &Glue (The Elmer's school glue kind) in 1:1 ratio
 A few tesaspoons of baby oil to reduce cracking
 A microwavable container and a stirrer
 Some lotion

Stir up all the ingredients in the container and microwave it with breaks in between; keep stirring the clay so that it doesn't stick to the bottom. Keep heating up until it no longer sticks to the sides/bottom and becomes smooth. Knead it by smoothing on some lotion onto your hands till the temperature reduces back to normal and store in clingwrap because air will dry it out if you keep it out in the open. Don't store in moist places to prevent mould!


For larger quantities:
Simply buy some, or maybe you already have some on hand?

-Acrylic paints
-Green electric tape or floral tape
-A jar or a ribbon to tie up the bouquet

How-to:
1.Once you have your clay ready, simply have a sample (or a photograph) of the flower you want to simulate and mold it accordingly. I used this and this picture to inspire me throughout. I also had one of my fake flowers in front of me while I was molding just to keep track.

2 For each petal, start off with a mini ball then flatten it out into the shape of a petal. For the bud at the center, cover the pen's cap top completely and then move outwards with the petals  making the flower larger as you make the petal curl outwards. Scrape of the excess clay accumulated around the cap (at the flower's base) after finishing the rose making sure you leave behind a very thin but smoothly merged layer so that individual petals don't crack and fall off later.
DIY Botanical Pen/Pencil Bouquet as Grad Gifts #diy #ideas #gifts

3.The result? A super natural-looking rose!

5. Air dry clay takes around 12-24 hours to dry depending on the size. So leave it out for a day!

6.Paint it any color you like. I suggest using different colors of the same family and adding a hint of yellow to give a little contrast.
Try experimenting with a variety of flowers

7. Dress up the pens (and any peeking  gaps on the cap which you should be having unless your flower is enormous) with green tape .

8, Finish off with a pretty bow and a gift tag or pop it in a cute mason jar or the likes for even more fresh effects!

Enjoy! The best part of the DIY is with the exploring and painting. You can never get enough of the combinations you'll get!
Even easier to create with a bunch of friends! You'll create a bouquet in no time!

DIY Botanical Pen/Pencil Bouquet as Grad Gifts #diy #ideas #gifts

This photograph is my mum's personal favorite. No.Idea.Why.

DIY Botanical Pen/Pencil Bouquet as Grad Gifts #diy #ideas #gifts

Zooming in on the other types of flowers I made. Was so fun to fashion flowers out of clay I didn't even know the name of. And now I made myself look like an idiot on the world wide web.

DIY Botanical Pen/Pencil Bouquet as Grad Gifts #diy #ideas #gifts

..........

If you liked this DIY, make sure you pin it so other peeps can benefit from it too! (cuz' sharing is hot!)


Subscribe to Craft A Doodle Doo ( in the sidebar) or join me on Pinterest/Facebook for endless more wacky DIY ideas and fab eateries!

Check out all my other fantastic DIY ideas in my DIY Gallery!


Wishing all the grads a great future,
Love you all,
Nash


Monday, May 12, 2014

CRAVINGS RAVINGS // MANGO FLOAT CHILLERS!

Food fantasy, that's what this is.
It actually happened to be born out of one. One fine brunch at Mugg & Beans, we happened to order a tantalizing drink which I, at that time had no idea would make its way to the blog. Honestly, I can't remember the name of that magical sherbet, but this is an oh-so-glorious dupe for a way more affordable price per glass, and because the entire thing looks like marbled layers after layers of juicy, ripe mangoes with sweet, creamy vanilla icecream that look like they're floating atop each other, I named these babies: Mango float chillers!

Dad can't seem to get enough of these, neither does mom. I made these two days in a row just because they were that delicious. Perfect for the blazing summers here.

And then I tossed on some whipped cream and chocolate chips/kiwis and more mango chunks for good measure. Invite family and friends over for a casual outdoor gathering and these will be the star of your party or snuggle up with an individual one to pamper yourself after a sweltering day out.


Delish.

Mango Float Chillers
Serves: 2

Ingredients:

About a cup and a half of chilled mango puree
An equal amount of Vanilla ice cream as the puree.
Whipped cream (to top)
Icing sugar (as preference. I used 1/8th cup)
Corn syrup/Mango syrup (optional)

For the topping:

Mini chocolate chips
Other diced fruits

How-to:

1. Leave out the icecream and mango puree (if you're using the frozen version) to soften until semi-solid.
2. In a blender combine all the mango puree with the required amount of icing sugar, I recommend to add a tad bit lesser sugar than your prefer because the vanilla ice cream adds a lot of sweetness. For an even thicker and candy-er version, add about a tablespoon of corn syrup and keep aside.
3.In another bowl, take out little chunks of the semi-solid vanilla ice cream and churn it with a spoon till it's a thick and creamy liquid.
4. First spoon in the layer of mango puree as the base. Take a spoon and bring up a little of the puree on all the sides. Then spoon in a tablespoon of the vanilla ice cream bringing it a little above and below with the spoon into the puree. Then spoon in the puree again. Gently fold in a little to create the marbled effect between each layer.
5.keep repeating step 4 till the glass is 3/4th full!
6.Top with whipped cream and add mango syrup or fresh fruits. I added mini chocolate chips in one and fruits in the other.

Serve chilled!


Look at all those lovely marbled layers!


And that healthy doze of semi-sweet chips! :)

Florals make everything all the more prettier don't ya think??

Hooked on this?? Why not pin it and share it to let everyone know? 
..............................

Follow me on Pinterest and Facebook or subscribe to get a better deal of DIY goodies and heavenly recipes in store for you!

............................


Stay happy!

Love, Nash
(PS: I'm in the midst of a thunderstorm of exams right now which is why I haven't been uploading regularly, sorry!)


Friday, April 11, 2014

INSPIRATION NATION// DIY ROSES FROM EGG CRATES!

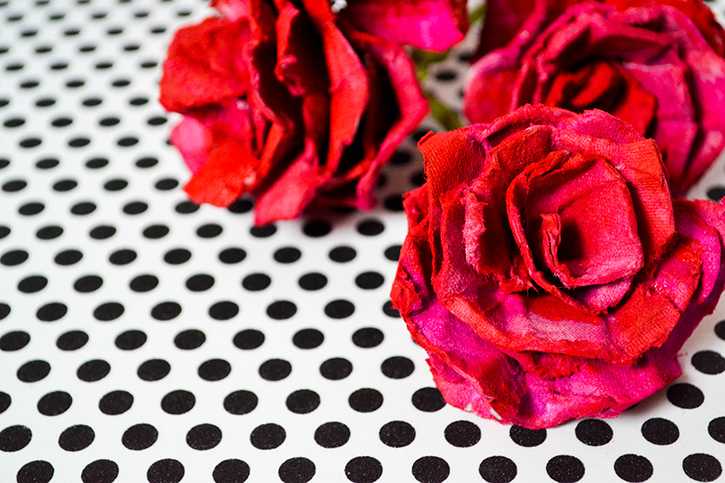
Mommy dear has quite got the hang of my crafty endeavors now which is why she gifted me an empty egg crate last week. I suppose only us craftstresses would see the opportunity there; so I turned this basic kitchen trash into treasure : DIY Roses from egg crates! It was obvious wasn't it? I'm such a rose person, and all of us are looking for new ways to make this Spring pop! Thanks, mum!

The instructions are really basic. Just cut, paint, mold, repeat. Then fashion them into just the sweetest, romantic rose using your favorite super-glue and use them any way you wish. No one's even probably going to guess these beauties were made with egg crates!

You'll need:
-An egg crate, in a light color preferably.
-Acrylic paints in different colors and large-tipped paint brushes
-Newspapers (for easy clean-up)
-Super-glue of your choice

Optional:
-Sturdy wire for steams
-Green ribbon

How-to:
1.Begin by cutting across each row of little cones from the egg tray. Then cut out each row into individual cones. Don't worry I know these will be pointy for now.
  Snip off the pointy end of the cones to make them more curvy. Like rose petals, yeah? Paint them, preferably with a large fluffy paint brush! (I used two different colors, hot pink & bright cherry red to get a more natural effect.) Make sure to get around all the nooks and crevices.

2. For the center of the rose take the smallest half cone (you find them on the extreme left and right of each row of cones) and curl it inwards. Then glue down to secure and make it look like a bud.


3. For the rest of the cones. slit with a scissors as shown in picture across the length of the cone so that you get a longish petal and then mold this to fit around the bud.

4. Keep repeating and adding more 'petals' until you have a rose in full bloom!

5. If you'd like to pop 'em in a vase like me, wrap some green ribbon onto metal wire ( I used the ones from my foam curlers in my DIY Ring Box post). and glue them down to the base of the rose. (Don't forget to hold in place for a few minutes till the glue is dry and the rose sits smug!)

You can use these as gift toppers too or for photography props! Stunning either way!


Liked the idea? Pin  it! (cuz' sharing is hot!)
................

You can also follow me over @ Pinterest/Facebook/Instagram or become a subscriber for regular DIY updates and year-round freebies!

............
And here's the DIY Ring Box I talked about above. The foam curlers have metals inserts in them which I used for the stems of the roses!


Check out the rest of my DIYs in my DIY gallery, you wouldn't know what you may discover. ;)

Lots of hugs,
Nash ( I think you can tell I love a lot of pink & red, lol)


Thursday, April 10, 2014

THE FREEBIE JUBILEE//MODERN REVELATIONS COLLECTION!

I hope you darlings didn't think that the start of my online shop meant the end of my freebie collections. I was just so busy getting my shop up and running and launching a few new products that I had to side track uploading freebies for a while and I'm glad to say I've put together a new freebie for you! :) :)
This is the first time I've introduced something Ikat. (I think I've found my new design crush!) Aaaand lots of gorgeous contrasts, monotones and of course my trademark floral patterns with a twist.

Perfect for the design contemporaries out there looking to add a dash of energy to their projects. Use these for scrapbooking, invites of all kinds, treats, party favors, giftwrapping, screen printing and endless other ways to switch the spark to your creativity!

Please be considerate and note that these printables are strictly for personal use. All printables available in my online shop can be used commercially. If you have any doubts, just drop me a mail!

You can download the entire collection here. (Download instructions if you are a newbie to this: Once the download is done, right click and extract the files from the folder. The files are huge, so I had to compress them for a quick download!)

Last of all, enjoy & don't forget to pin n' share!

Let me know what you think! What would you like to see next?
...................
Subscribe to Craft A Doodle Doo or follow me on Pinterest & Facbook for regular updates of freebies!
..................


(And you can see my other gorgeous digital printables in my freebie gallery!)


Lots of love,
Nash
(Trouble extracting files? Just drop me a comment to let me know and I'll upload the individual images for you!)

Wednesday, April 9, 2014

BEAUTY IN A NUTSHELL//FOUNDATION MELTDOWN TRICK!

Sans primer, sans makeup setting sprays, sans milk of magnesia or whatever else you may use to get your foundation NOT to budge; this is the mother of them all.

I learnt this trick from gossmakeupartist on Youtube. If you haven't been visiting that channel to help solve some serious makeup doubts, then you aren't lookin' good enough. But here's the deal, you have oily skin, or maybe not. Maybe you're like me and maybe you just have a pesky oily nose which tends to be the only place where foundation slips within less than 30 minutes and then it shines like the next brightest chandelier in the room. You can thank me later because this right here is how to make your foundation last ALL day.

The trick sounded so outrageous, so utterly tempting for my poor nose which loves to sport humongously large pores and tremendous shine that I needed to put it to the test.

The secret ingredient is..loose powder. I know, I'm not kidding you. The whole fancy-shmancy deal lies with the timing of application: not after foundation, apply it before foundation.

According to the video, it has to be loose powder, not compact. So here's what I did, I'm more of a compact powder kinda girl, so loose powder isn't an available luxury in my crib. I used cornfour/cornstarch instead.

Guess what, it worked perfect.


Materials:
-A clean small jar (sample jam jars work perfect.So do travel-sized lotion jars. After you wash n' dry them, give them a clean with rubbing alchohol). This makes it great to pop in your purse.

-Cornflour/cornstarch or loose translucent powder (if cornflour looks ashy on your skintone, even though it's fairly translucent, mix it with a tad bit of cocoa or cinnamon powder)


Coupled with my DIY primer recipe and my DIY blotting tissues, this is a meltdown ninja combo.Even alone, it stands proud. :)

The Test:

I kept checking regularly throughout the day for the ultimate stay-on test. I tried this with two foundations. A totally crappy foundation (Maybelline Dream Liquid) which doesn't suit me at all - It has great finish but one hour later, it slides all off my face, leaves my face patchy, even my forehead shiny, you get the gist. With this? My nose was still a tad shiny, but there was NIL dragging around with the foundation. Even 8+ hours later, it looked like I had just put it on. Skin was even all round, it hadn't slid off places and disintegrated. None of that nonsense.

Also there was a reduction in oxidation. How-utterly-cool. (Normally, this foundation makes me look as dull as a muddy puddle.)

Next, I tried it with a friend's foundation. I'm not sure what company it is but it was a long-last foundation and I love it to bits (probably the one I'd purchase next). I already love the foundation because it stays on so long and applying the powder before the foundation and after moisturizer, sunscreen etc. just made it completely shine-free & truly gorgeous.

My friend and I wore the same foundation on that particular day and though hers faded a lil and still looked pretty with a teeeensy bit of oxidation, mine didn't budge or fade. Win!

.............................

So if you have a favorite foundation, this trick is gonna make it your beyond favorite. If you're trying to make a nasty foundation work, this is gonna make it workable.

And don't worry about your face looking cakey. I promise it won't. In fact, the cornstarch acts like a filler (just like primer) post-moisturizer for the skin. I suppose the video specifically mentions loose powder because it is finely milled and won't make your foundation look cakey.

The best part? This is so ridiculously cheap.

Have any questions or comments? Ask below!

Don't forget to share and pin! Also subscribe to Craft A Doodle Doo or join me over at Pinterest & Facebook for simple, outrageously genius tips!

Love, Nash


Saturday, March 29, 2014

INSPIRATION NATION// DIY STAMPS!


I'll ask this straight, are you up for some fabulous textile printing? ;)


Call me nuts, but I see a lot of potential in bottle caps. "Bottle caps, yep you're crazy!". Let's just date back and take a look at the in-door style closet organizer I made using bottle caps. It's still sturdy and rocking my wardrobe today, and let's not forget these come for free! So what else can you exploit these for? DIY Stamps of course! Stamps are for babies, you say.Maybe they were, but today let's make a rebel out of ourselves, shall we? :D


You'll need:

Bottle caps, lots of them!
Craft Foam (plain or patterned)
Super-strong craft glue
Stamp pads/Paint
A scissors and a pencil
Washi Tape (optional)


How-To:

1.If you'd like your stamps to look extra cute washi tape the tops first. Of course you don't need to do this, it's just one of the perks of being excessively girly.


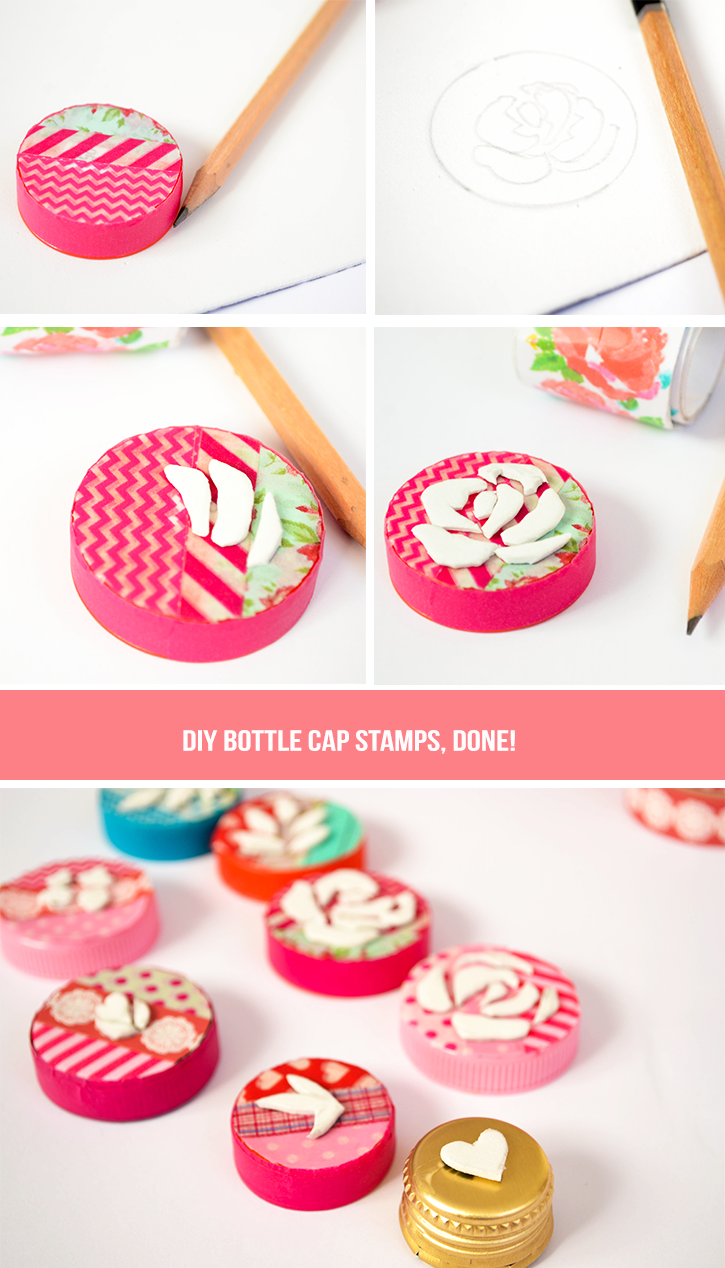
2. Trace around the bottle cap's circumference with a pencil to determine how much area you have to draw and doodle any shape inside. I just made me an entire botanical set, so I began with a rose. If you need, you can have a template or anything of the kind for reference. :)

3.Cut out the shape you drew and glue it down onto the cap.

4.Grab your stamp pads, or paint (I used acrylic paints) and begin stamping away. I just used a pretty satin napkin to put my pattern on.
Tip: If you're using paint, it can be a tad difficult, so just make sure that:
       - You have a nice, even coat of paint on the stamp shape.
       - Make the paint a bit diluted (using water) so it's smooth and not gunky because
       that'll make the designs, uhhhh...weird.
5. Be awesome and make yourself a cup of tea! (or coffee if you're a coffee person. I'm more of a tea + iced coffee girl, I don't know why I typed that here.I know it isn't even irrelevant)

I poured myself some hot cardamom tea in a cute mug and my pretty new napkin to cheer me up. It's the little things that give me glee.

Here's a close up of the print. Don't they look pretty? How about making ombre patterns now? I think that's what these lil guys will do next.


Liked these idea? Pin it, sweetheart (cuz' sharing is hot)
......
In the meanwhile, come join me at Pinterest and Facebook or subscribe to Craft A Doodle Doo if you'd like to get updated on loads more DIYs!
......

A million hugs,
Nash

(PS #1: Need another textile design tutorial? This Cath Kidston inspired print tut may just bowl you over! Or check out other DIYs in my DIY Gallery!)
(PS #2: I apologize for the changing blog design, but I'm trying to get a hang of how I want it look eventually. Yes, I'm indecisive.)


Thursday, March 27, 2014

PRETTY ME UP// DIY BEJEWELED HEADBAND!

This is the first rich crafty goodness I churned out for Cut Out+Keep on their Crafty Superstar feature! It's a uber-luxe bejeweled headband and looks so sophisticated at the same time. ( because we know that not everyone fancies OTT things). Looking to perk up a plain outfit?
I bet  this'll do the job!


Just corral your broken jewelry and random beads. (or maybe have some old dresses that you never wore because they were too sparkly for your taste? Switch the sparkle to your hair instead!) Your locks deserve that extra pampering,don't they?

If you already have a crazy assortment of beads and gems on hand, you're good to go!
See the full tutorial I made for them here! or


And if you're gifting it to a friend (like me!) then add it in a small pretty sachet for her to keep in! ( I just made mine out of some satin scraps and a fabric tape gift tag!)

You can check out another super-pretty headband tut here or more accessories to pump up your wardrobe in my DIY Gallery!
.............
Meanwhile, hop over to my Pinterest and Facebook to follow for hot new DIYs + become a subscriber! (I know we all wanna look gorgeous for frugal!)
............
Take care, (Don't forget to pin and share with your friends!)
Nash

FRESH IRRESISTABLE IDEAS...

RIGHT TO YOUR INBOX!

* indicates required

View previous campaigns.