Showing posts with label The Decorista Chronicles. Show all posts

Thursday, February 13, 2014

The Decorista Chronicles//DIY Ring Box!

You know those gorgeous ring boxes you see in stores? Maybe you won't be seeing them just in stores anymore....just maybe...if you're a jewelry junkie, you probably need a quick, glitzy way to organize those pretty jewels a-a-a-and.... here's the ultimate solution (and you wouldn't believe what it is) that I came up with!It fits in quite an array of rings and eartops and looks the cutest ever atop your vanity. Also a fabulous way to gift it to someone. For the full instructions, drop over at Laurel's cute craftspirational blog: A Bubbly Life to see my guest post!

Hungry for more DIY?
You can also check out my DIY Gallery here!
Take care,
XOXO, Nash

Monday, January 27, 2014

The Decorista Chronicles//DIY Wall Decals!

It's been a while since I did a sassy wall art tut here at Craft A Doodle Doo but this was invented at the request of a very special friend who said she wants some decorspiration for her room. This is so easy, looks as in vogue as they come and is made with one basic material. On top of that, it's removable so you can change 'em up anytime and you see why we are not doing stencils here? I'd love doings stencils on my walls, but then the paranoia drops in that the future me would probably indulge in some other design. This one's a no-mess peel off and that makes it all the more cooler!
This of course doesn't mean you have to make a jewelry niche too, headboard decals are the thing I say but I have a pretty su-weet headboard already. The best bet would be doing this under a shelf (or on the top of it). Also consider hanging a grand oval mirror over your vanity and having the decal as the frame of the mirror. Endless options I tell ya.

Start away already you tell me. buuuuuut I can never start without this brilliant piece of inspiration.

Materials:
1.Adhesve sheet in any color you'd like and in any texture (You know, the peel-off back ones. I'm using my trusty velvet textured adhesive sheet in deep red)

2.Masking/scotch tape,X-acto (craft knife) and a pair of large and small scissors

3.A ruler to level the decal onto the wall.

4.A cutting mat or any surface as such

5. One whoppin' pattern you'd like to decal. Look around for lots of inspiration. My friend loves damask so that is what I chose.

How-to:

1.Start by printing out a template of your design. Make sure you print it out the right size. My damask corner patterns are about half of an A4 sheet (just so that you get the idea). 

Cut out the adhesive sheet to be double the area of your template and slightly larger and fold it in half. 

2.Tape all the edges of your pattern onto the folded adhesive sheet so everything is tightly secure in place and won't more when you're cutting out the pattern.

3.Using a craft knife and the different sized scissors, cut the pattern out. A good tip is to not start out with a too complicated pattern.
Here's the two damask corners for each side of my "shelf" decal.
I then cut out a long strip and two smaller ones (for the damask corners) measuring the width of the wall/space I wanted to put my decal on. This long strip was supposed to go on top of the damask corners.

4.Use a ruler (or probably the leveling app on your Iphone,lol) to make sure you have the alignment right when you place the decal. Peel off and smooth it onto the surface. Since it comes off mess free, even if you have those annoying 'wrinkles' you can peel back off and smooth it over again.

And that's it!

As you see mine is fashioned liked a little jewelry alcove. So I used transparent command hooks to hang in pretty jewelry.
If you're wondering where the jewelry from my faux Vintage China wall display went (I took it out so that it shouldn't compete with the jewelry under the decal in the photographs :D )

This looks so much more stunning in real life than in the pictures (one of those see to believe pretty kinda things!). A showstopping impact ladies!

So are your walls bare? Dying for a classy makeover, maybe lookin' for a pop of elegant color? Or maybe you've just been on the plain and straight quest for the easiest way to do homemade decals.
Now you know ;)

If you liked this nifty idea, pin and share it with other people you know. You can also be pals with me on Pinterest, Facebook and follow for some glamorous new decorhacks!

Meanwhile, if you'd like to lay those pretty eyes on more of my DIYs, you can drop in to tour my DIY gallery here!

Have a great day,
Nash

INSPIRATION COLLAGE PHOTO CREDITS:
http://www.houzz.com/photos/6617422/Chandelier-Wall-Decal-modern-decals-
http://www.houzz.com/photos/6616204/Riviera-Giant-Peel---Stick-Applique-modern-decals-http://www.houzz.com/photos/6617239/Cherry-Blossoms-Wall-Decals-modern-decals-


Thursday, November 21, 2013

The Decorista Chronicles//Sweet Hanging Organizer DIY

Back then with all the photoshop fiddling, I realized that one of my all time oohlala combinations is fresh roses and black n' white stripes! I just can't seem to get enough of the vintagey (that's not a word, I know) sweetness of the roses paired with the modern edgy stripes! So, in my quest to relive this combination in someplace besides my free paper printables (download 'em here!), this adorable hanging organizer was born - from pillowcases!
Let's first peek in on my own inspiration shall we, girlfriends?
Okie, back to the DIY now, you'll just need two pillowcases for this, either the same pattern or two different coordinating ones. I'm not sure whether you'd want to sew up really pretty pillowcases to make a really pretty organizer but if you're single (aha!) and there's lonely pillowcases hangin' round your home, this is for you. If you found some awesome pillowcases at a thrift store, this is for you. If you are a dorm room girl this is for you and if you are a lover of cute things, oh this is DEFINITELY for you!

Apart from the pillowcases you'll need: some basic beginner sewing skills/sewing machine. pins to pin the fabric in place while sewing, a pencil to mark the fabric, a pair of scissors and a hanger in a coordinating color with the pillow fabrics. I had a white hanger and I painted it a bright red-pink to cheer me up!

HOW-TO
NOTE: This is just a 5-step process and I  tried really hard to make it as simple as possible for beginners (cuz' sheh I'm such a dork at this whole sewing business too), so please don't let this scare you cuz' it's really simple and if you do have any queries, drop me a comment below!

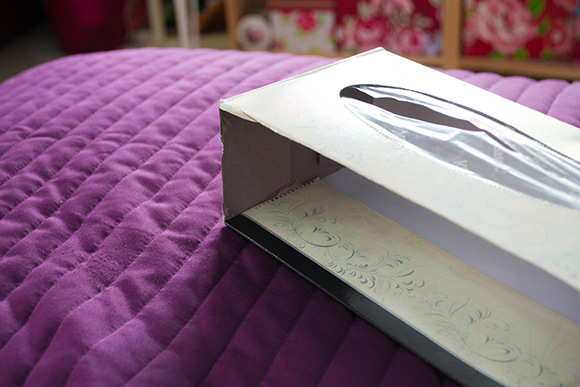
1.Begin by cutting folding your pillowcase around 7 inches over one side like this. The printed side should be folded over the plain side as in the picture below. (If your pillowcase is printed on both sides, then just fold over one side onto the other across a length of approx. 7 inches)
2.Then run your sewing machine (or sew by hand) along both the 7 inch sides. I did a zingzag stitch for a more graceful edge (wee!) and make sure the seams are just touching the edge.
If you are not much of a sewer then use strong good quality fabric glue along the border of the pillowcase and fold in. Then fold seven inches over and glue down thoroughly over the just folded- in border. The below picture will help you understand.
This should form one pocket of your organizer; you can do as many pockets as you want, I think two is great for hanging just about anywhere if you're using small-medium sized pillowcases.

3.Next fold your second pillowcase exactly as in step one above (don't sew the edges yet!) and place it on above the first pocket-you-made's flap so that they overlap.

4.Mark a line with a pencil for the depth till where you'd like your first pocket to overlap the second one.  (The first pocket you'd sewn actually goes on second in the organizer and the second pillowcase you sew "over it" is the first pocket after the organizer is done).Then sew along this line. Remember to sew along ONLY the base (and not over the folded side too) of the second pillowcase to the base of the top of the first pillowcase so that these both are now stitched together.
Once both are attached you can now sew the sides of the second pocket just like you did for the first.
NOTE (SEQUEL): You may have noticed that in the pictures the floral pocket is ABOVE the striped one. That's because when I took the pictures for the process I had decided to put the striped one first but later interchanged them as I though floral on the top looked better. (indecisive much? Yep)

5. I don't have pictures for the last step but it's really straightforward. Fold the topmost edge of the entire organizer over the rung of the hanger and stitch at the back or apply fabric glue.

Alternatively, you can skip the whole sewing/gluing process depending on what you're doing and instead punch holes on the side edges of both the pockets and loop through a ribbon and tie taut, like this.
And that's all there is to it. Strut your stuff to the organizer and hang it anywhere you'd like with adhesive hooks. Right now mine's hanging down on the wardrobe knobs! :)
The floral fabric was designed by me, so overjoyed at how it turned out and I'm thinking of uploading the design on Spoonflower. What do you think? Beauty or beastly?
If you liked this simple and cute DIY, do share it with all the other girlies in your life out there and pin this!
..........................................
And if you really dig it, consider following me on Pinterest and Facebook or become a subscriber!
...........................................
Have an outrageously fun weekend! 
Love, Nash

Get the image to pin below!


Friday, September 27, 2013

The Decorista Chronicles//DIY CUBBY SHELF ORGANIZER {Design Your Own Series-3}

Good day class! As part of the thrifty+glam makeover editions we do in the Design Your Own Series..we present you part 3-DIY Glitter Cubby Shelf Organizer!

Like the caption reads, this is a stylish, dirt cheap and easy solution to gather round your essentials. Here are the basics:

Steps:
1.Spray the corkboard with adhesive spray and sprinkle on glitter to cover whole. Do two-three coats to make sure the glitter stays put for a long, long, long, long, long time.

2.Best to use empty colored duct tape rolls if you don't want more work put into this. I didn't have those on hand so I covered mine with adhesive velvet fabric, and painted one hot pink with acrylic paint for a bright pink POP!*

3.Hot glue the tape rolls onto the board.Set a few hours to dry.

4. Use heavy duty foam mounting tape (and loadza that) on a wall, shelf side or anywhere you'd prefer these to grab n' go in the morning and install your finished cubby shelf unit.

5.Chuck your go-to essentials in, use it, flaunt it, pin this and share this!

*Painting gives a shabby look and feel to your "cubbies"


EXTRAS: Use broken jewelry pieces like earrings, or studs from necklaces and hot glue them to push pins to display notes on the corkboard. You'll never know when you'll need an emergency loving pick-me-up. ^_^


Check out the rest of the Design Your Own Series Below
.................................
GIVE YOURSELF A TREAT! Join Craft A Doodle Doo on Pinterest, Facebook and Subscribe to treat yourself to fabulous, do-able and cheap DIYs, savory eats, mouthwatering freebies and a tonnage of ideas!
                                                       .................................
Hopin' you'll drop by again, xoxo
Nash

Friday, September 13, 2013

The Decorista Chronicles//Design Your Own Workspace!

Here's today's doze of awesome! DIY Desk Organizers in the newest Design Your Own Series! After the decent popularity of the Wardrobe Stylist Series which features effortlessly lovely, cheap and easy DIY projects that add to your wardrobe glamour, I did a mental note to start up on another series with the same motto!
We have a file box, and a super-cute mini shelf at the bottom that houses my washi tape. You can chuck in notebooks, cute pads and a lot of other stuff; but here's why I went with washi tape!

 Remember my washi tape display stand here? If I didn't clean it regularly, the white plates would periodically collect dust because my cute little stand sat by the window and the Middle East is known for random sand storms!
 ..............................................
Here's what you need!
-White Paper sheets, scissors, craft glue and pencils
-Skewer sticks
-Pretty giftwrap/scrapbook paper
-Sturdy boxes in different sizes*
-Craft Knife
-Metal Ruler (for leveling, measuring and to aid in cutting)

*I used a tissue box at the bottom, however my original plan was to use VHS cassette boxes, ya' know, the transparent ones that used to hold our old-time cassetes? I wanted to layer two of them for all my washi tape, but I couldn't remember where I'd put them when we shifted homes,so I ended up using a tissue box and as you can see it got ever-so-slightly bent.
So I highly recommend you use those transparent/solid VHS tape boxes cuz' they look so much more classier and hold all the more well!
........................................................ 
Steps:
1.Begin by cutting out the flap from one of the longer sides of your box. Cover the ugly cardboard insides with white paper/any paper and glue down the flap to the base.
  2.Measure the height of your box from the side, take the half height and draw a line across, which divides the shorter side of the box in two
3.Insert four-five skewer sticks at equal length intervals and pierce them out through the other sides. You wanna make sure that they just about fit the length of the box and dab glue at the ends just for extra strength.

4.Try on your washi tape arrangement!
(If you are using cassette boxes, then skip step 3!)
And because I was in such hysterics at the time, I simply draped my scarf on top of the box! *sheepish*
4.If you've had any so-not-attractive edges while using the craft knife (like me)on your box, you'll want to make those straight now with the help of scissors.
 .............................................................
5.For the file box, take your sturdy larger box whose base should approximately match the width of the lower box's base (which now holds washi tape)
6.Cut down slant from the top at both the longitudinal sides
7.Wrap it up!
8.Hot glue the file box onto the base box.

9.Go around with a trim of washi tape for added drama!


And to give you guys a teaser, the next post in the series will feature "Design Your Own: Stationery!". Design Your Own aims to give you a fantastic office space without having to spend a dime! College students and dorm room'ers, this is your cue!
So, in the next thriller here at Craft A Doodle Doo, I show you how you can make your own journals and note books (like the one I handcrafted above) with a watercolor flair that looks store-bought!

Make sure you don't miss out on the next post!
 ............................................................
Join me on Pinterest and Facebook or become a subscriber to make sure you receive your next pill of epic craft action!
............................................................

You can check out the tut for the cute trinkets jars above here!
To see how to make your own washi tape, hop here!
*********************
Pin this post now if you've found it handy and spread the word!
Oodles of love n' hugs;
Nash


FRESH IRRESISTABLE IDEAS...

RIGHT TO YOUR INBOX!

* indicates required

View previous campaigns.