Thursday, April 10, 2014

THE FREEBIE JUBILEE//MODERN REVELATIONS COLLECTION!

I hope you darlings didn't think that the start of my online shop meant the end of my freebie collections. I was just so busy getting my shop up and running and launching a few new products that I had to side track uploading freebies for a while and I'm glad to say I've put together a new freebie for you! :) :)
This is the first time I've introduced something Ikat. (I think I've found my new design crush!) Aaaand lots of gorgeous contrasts, monotones and of course my trademark floral patterns with a twist.

Perfect for the design contemporaries out there looking to add a dash of energy to their projects. Use these for scrapbooking, invites of all kinds, treats, party favors, giftwrapping, screen printing and endless other ways to switch the spark to your creativity!

Please be considerate and note that these printables are strictly for personal use. All printables available in my online shop can be used commercially. If you have any doubts, just drop me a mail!

You can download the entire collection here. (Download instructions if you are a newbie to this: Once the download is done, right click and extract the files from the folder. The files are huge, so I had to compress them for a quick download!)

Last of all, enjoy & don't forget to pin n' share!

Let me know what you think! What would you like to see next?
...................
Subscribe to Craft A Doodle Doo or follow me on Pinterest & Facbook for regular updates of freebies!
..................


(And you can see my other gorgeous digital printables in my freebie gallery!)


Lots of love,
Nash
(Trouble extracting files? Just drop me a comment to let me know and I'll upload the individual images for you!)

Wednesday, April 9, 2014

BEAUTY IN A NUTSHELL//FOUNDATION MELTDOWN TRICK!

Sans primer, sans makeup setting sprays, sans milk of magnesia or whatever else you may use to get your foundation NOT to budge; this is the mother of them all.

I learnt this trick from gossmakeupartist on Youtube. If you haven't been visiting that channel to help solve some serious makeup doubts, then you aren't lookin' good enough. But here's the deal, you have oily skin, or maybe not. Maybe you're like me and maybe you just have a pesky oily nose which tends to be the only place where foundation slips within less than 30 minutes and then it shines like the next brightest chandelier in the room. You can thank me later because this right here is how to make your foundation last ALL day.

The trick sounded so outrageous, so utterly tempting for my poor nose which loves to sport humongously large pores and tremendous shine that I needed to put it to the test.

The secret ingredient is..loose powder. I know, I'm not kidding you. The whole fancy-shmancy deal lies with the timing of application: not after foundation, apply it before foundation.

According to the video, it has to be loose powder, not compact. So here's what I did, I'm more of a compact powder kinda girl, so loose powder isn't an available luxury in my crib. I used cornfour/cornstarch instead.

Guess what, it worked perfect.


Materials:
-A clean small jar (sample jam jars work perfect.So do travel-sized lotion jars. After you wash n' dry them, give them a clean with rubbing alchohol). This makes it great to pop in your purse.

-Cornflour/cornstarch or loose translucent powder (if cornflour looks ashy on your skintone, even though it's fairly translucent, mix it with a tad bit of cocoa or cinnamon powder)


Coupled with my DIY primer recipe and my DIY blotting tissues, this is a meltdown ninja combo.Even alone, it stands proud. :)

The Test:

I kept checking regularly throughout the day for the ultimate stay-on test. I tried this with two foundations. A totally crappy foundation (Maybelline Dream Liquid) which doesn't suit me at all - It has great finish but one hour later, it slides all off my face, leaves my face patchy, even my forehead shiny, you get the gist. With this? My nose was still a tad shiny, but there was NIL dragging around with the foundation. Even 8+ hours later, it looked like I had just put it on. Skin was even all round, it hadn't slid off places and disintegrated. None of that nonsense.

Also there was a reduction in oxidation. How-utterly-cool. (Normally, this foundation makes me look as dull as a muddy puddle.)

Next, I tried it with a friend's foundation. I'm not sure what company it is but it was a long-last foundation and I love it to bits (probably the one I'd purchase next). I already love the foundation because it stays on so long and applying the powder before the foundation and after moisturizer, sunscreen etc. just made it completely shine-free & truly gorgeous.

My friend and I wore the same foundation on that particular day and though hers faded a lil and still looked pretty with a teeeensy bit of oxidation, mine didn't budge or fade. Win!

.............................

So if you have a favorite foundation, this trick is gonna make it your beyond favorite. If you're trying to make a nasty foundation work, this is gonna make it workable.

And don't worry about your face looking cakey. I promise it won't. In fact, the cornstarch acts like a filler (just like primer) post-moisturizer for the skin. I suppose the video specifically mentions loose powder because it is finely milled and won't make your foundation look cakey.

The best part? This is so ridiculously cheap.

Have any questions or comments? Ask below!

Don't forget to share and pin! Also subscribe to Craft A Doodle Doo or join me over at Pinterest & Facebook for simple, outrageously genius tips!

Love, Nash


Saturday, March 29, 2014

INSPIRATION NATION// DIY STAMPS!


I'll ask this straight, are you up for some fabulous textile printing? ;)


Call me nuts, but I see a lot of potential in bottle caps. "Bottle caps, yep you're crazy!". Let's just date back and take a look at the in-door style closet organizer I made using bottle caps. It's still sturdy and rocking my wardrobe today, and let's not forget these come for free! So what else can you exploit these for? DIY Stamps of course! Stamps are for babies, you say.Maybe they were, but today let's make a rebel out of ourselves, shall we? :D


You'll need:

Bottle caps, lots of them!
Craft Foam (plain or patterned)
Super-strong craft glue
Stamp pads/Paint
A scissors and a pencil
Washi Tape (optional)


How-To:

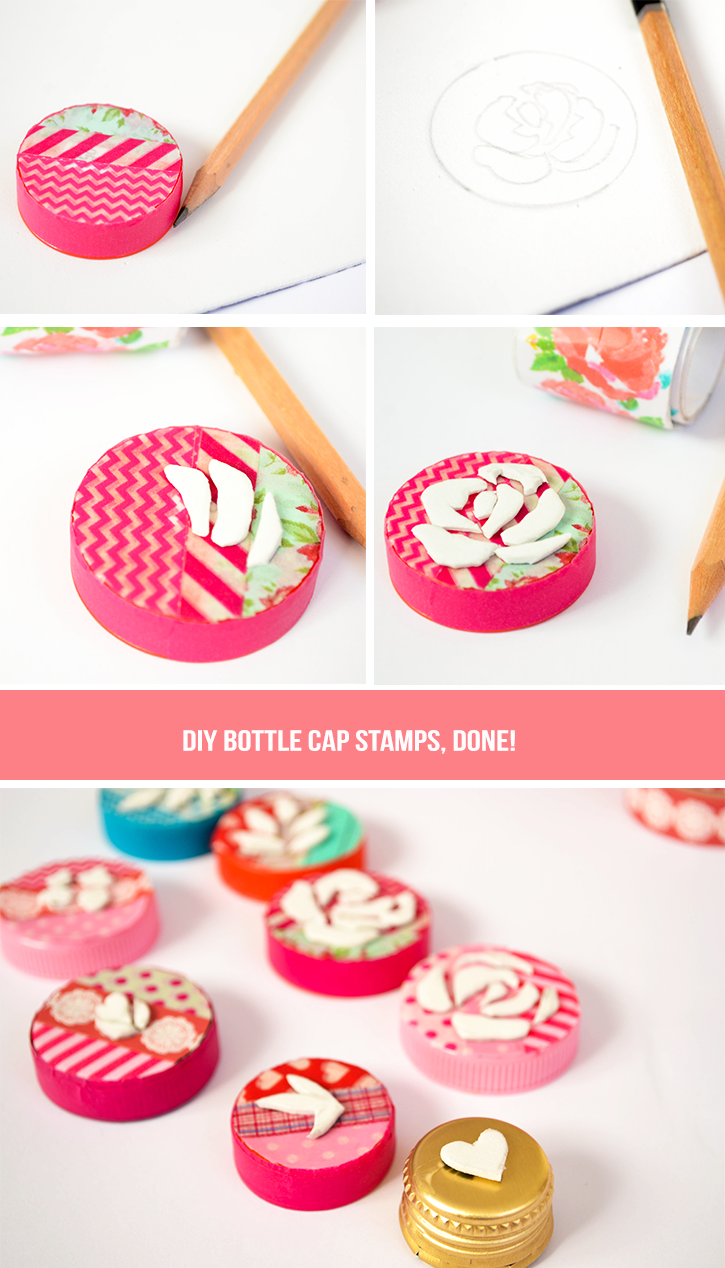
1.If you'd like your stamps to look extra cute washi tape the tops first. Of course you don't need to do this, it's just one of the perks of being excessively girly.


2. Trace around the bottle cap's circumference with a pencil to determine how much area you have to draw and doodle any shape inside. I just made me an entire botanical set, so I began with a rose. If you need, you can have a template or anything of the kind for reference. :)

3.Cut out the shape you drew and glue it down onto the cap.

4.Grab your stamp pads, or paint (I used acrylic paints) and begin stamping away. I just used a pretty satin napkin to put my pattern on.
Tip: If you're using paint, it can be a tad difficult, so just make sure that:
       - You have a nice, even coat of paint on the stamp shape.
       - Make the paint a bit diluted (using water) so it's smooth and not gunky because
       that'll make the designs, uhhhh...weird.
5. Be awesome and make yourself a cup of tea! (or coffee if you're a coffee person. I'm more of a tea + iced coffee girl, I don't know why I typed that here.I know it isn't even irrelevant)

I poured myself some hot cardamom tea in a cute mug and my pretty new napkin to cheer me up. It's the little things that give me glee.

Here's a close up of the print. Don't they look pretty? How about making ombre patterns now? I think that's what these lil guys will do next.


Liked these idea? Pin it, sweetheart (cuz' sharing is hot)
......
In the meanwhile, come join me at Pinterest and Facebook or subscribe to Craft A Doodle Doo if you'd like to get updated on loads more DIYs!
......

A million hugs,
Nash

(PS #1: Need another textile design tutorial? This Cath Kidston inspired print tut may just bowl you over! Or check out other DIYs in my DIY Gallery!)
(PS #2: I apologize for the changing blog design, but I'm trying to get a hang of how I want it look eventually. Yes, I'm indecisive.)


FRESH IRRESISTABLE IDEAS...

RIGHT TO YOUR INBOX!

* indicates required

View previous campaigns.