Showing posts with label Inspiration Nation. Show all posts

Saturday, March 29, 2014

INSPIRATION NATION// DIY STAMPS!


I'll ask this straight, are you up for some fabulous textile printing? ;)


Call me nuts, but I see a lot of potential in bottle caps. "Bottle caps, yep you're crazy!". Let's just date back and take a look at the in-door style closet organizer I made using bottle caps. It's still sturdy and rocking my wardrobe today, and let's not forget these come for free! So what else can you exploit these for? DIY Stamps of course! Stamps are for babies, you say.Maybe they were, but today let's make a rebel out of ourselves, shall we? :D


You'll need:

Bottle caps, lots of them!
Craft Foam (plain or patterned)
Super-strong craft glue
Stamp pads/Paint
A scissors and a pencil
Washi Tape (optional)


How-To:

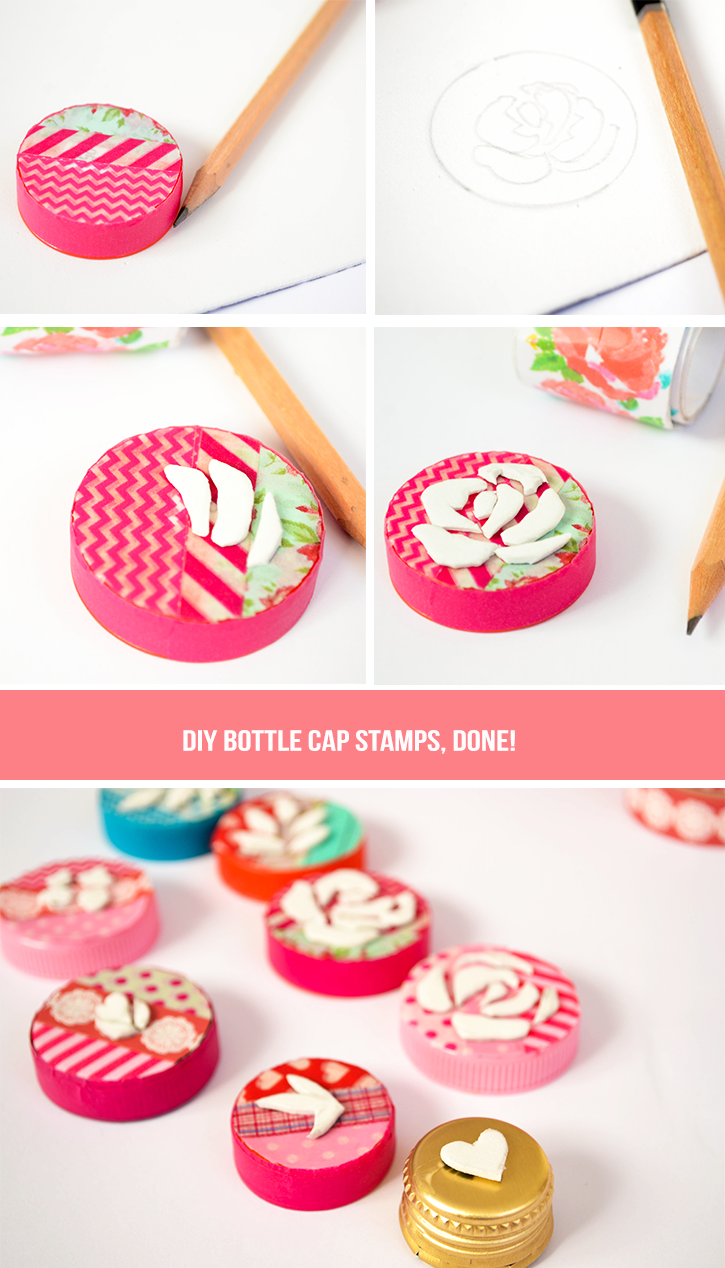
1.If you'd like your stamps to look extra cute washi tape the tops first. Of course you don't need to do this, it's just one of the perks of being excessively girly.


2. Trace around the bottle cap's circumference with a pencil to determine how much area you have to draw and doodle any shape inside. I just made me an entire botanical set, so I began with a rose. If you need, you can have a template or anything of the kind for reference. :)

3.Cut out the shape you drew and glue it down onto the cap.

4.Grab your stamp pads, or paint (I used acrylic paints) and begin stamping away. I just used a pretty satin napkin to put my pattern on.
Tip: If you're using paint, it can be a tad difficult, so just make sure that:
       - You have a nice, even coat of paint on the stamp shape.
       - Make the paint a bit diluted (using water) so it's smooth and not gunky because
       that'll make the designs, uhhhh...weird.
5. Be awesome and make yourself a cup of tea! (or coffee if you're a coffee person. I'm more of a tea + iced coffee girl, I don't know why I typed that here.I know it isn't even irrelevant)

I poured myself some hot cardamom tea in a cute mug and my pretty new napkin to cheer me up. It's the little things that give me glee.

Here's a close up of the print. Don't they look pretty? How about making ombre patterns now? I think that's what these lil guys will do next.


Liked these idea? Pin it, sweetheart (cuz' sharing is hot)
......
In the meanwhile, come join me at Pinterest and Facebook or subscribe to Craft A Doodle Doo if you'd like to get updated on loads more DIYs!
......

A million hugs,
Nash

(PS #1: Need another textile design tutorial? This Cath Kidston inspired print tut may just bowl you over! Or check out other DIYs in my DIY Gallery!)
(PS #2: I apologize for the changing blog design, but I'm trying to get a hang of how I want it look eventually. Yes, I'm indecisive.)


Friday, March 21, 2014

INSPIRATION NATION//DESIGN YOUR OWN BLOG! (And a FAB one at that!)

I must confess, I've become disillusioned with my newest obsession, blog designing! Now I've never really designed anyone's blog per se (just a few tips and tweaks for other friends), but I think I'm kind of fancying the blog design bandwagon! So today, I'll let you download a super-easy tutorial on how you can design your own blog (on Blogger, works for Wordpress too) and I'll give you all the blog design elements I designed in this tutorial for free!
     Seatbelt on girls!
I'm honestly head over heels for this one, so much that I feel like switching like my own blog design to the one in this tut, but I'm still in the process of primping up my own. ;)

I used Photoshop CS6 for this tutorial (the version doesn't really matter though) but if you're good at other online editing apps like picmonkey and pixlr then you can probably use those too. Isn't is nice when everything is so versatile?

The blog elements include the header, the fonts, social media icons and the navigation tabs. The above is a screenshot for you to see how they all look like after put together. Such a happy family!
The zip file I put for download include the pdf file which lists the detailed tutorial as well as the individual design elements to upload onto a basic blog template.

Header:
Every blog needs a whopper of a header. It's the first thing that makes those eyeballs stay put on your blog or else close the window pronto! Here's how I made mine and you can make yours too. Begin by thinking of a theme. I love fresh. pretty colors and it's Spring too, so I grabbed this image from Pinterest for reference and began painting away.

Hand-drawn doodles or painted designs are so much the chic trend now and they really give that casual+professional feel to a blog. Here are the steps:

We now import the image in photoshop (it can be a scanned file from your printer or a photograph you took, I used the photograph) and continue with the editing to create our pretty blog banner.

You can see the rest of the steps in the pdf file because the post will run incredibly large if I do post everything over here. (Yes, Nash you say, please don't force us to read your long drawl-y posts!)

A nice way to give your blog a super-polished look is to choose colors with a contrast. Use a few colors from one part of the spectrum and then choose a few colors from a contrasting range of the spectrum. Like, me being me, used a rage of hot pink to pale pink petals to add a feminine pop of color in the header, and a lot of gender neutral blues and greens to give a beautiful contrast. Of course, if you like, you can still make it all your favorite color, but I just think having a palette adds so much more visual interest!

The best part? You don't even need to be a good painter. Posing as one will do (I do the same!)

Fonts:

Fonts make up so much of the blog's readability. Fonts look great paired with contrasts too (Sans serif with serif. Plain fonts with calligraphic. Serious fonts with playful, handwritten ones). Whenever you'd like to use a fancy font, make sure you use it where you need a large font size. Generally, fancy fonts are difficult to read when they are small-sized. Stick to the very basic of fonts for large chunks of writing, because they are more readable and pleasant.

See all the font-mantra I just mentioned down below. The blog title has been written in a calligraphic font (I list the fonts names in the downloadable tutorial file). The tagline for the blog is written in a simplistic font. It helps the fancy calligraphic font pop even more!

Textures and Patterns:

While you can use a multiple of patterns and textures, make sure that you either
1) Use a focal design on one area of the blog and keep the rest minimal or
2) Use a variation of textures on different areas while making sure they all tie up perfectly well together (Usually making everything look unified goes back to the colors you used.)

Obviously the second choice is more difficult to follow through. For this blog design I kept the background completely plain but you can use a very minimal background too and it would still look great.

My rule of the thumb for the perfect laid back+professional design is this, pair opposites but not to the extremes. For ex, I paired delicate flowers with some geometry(circles)! They are not really opposites but circles usually don't come anywhere near flowers, do they? :)

Social Media Icons and Navigation Tabs:
Since I used the same colors and geometry for the navigation tabs as the header (again to tie everything together), I used an ombre pink for the social media icons.


You can check out how to:

1. Upload a header images to blogger
2.Upload social media icons for blogger
3.Upload navigation tabs in blogger:
To upload navigation tabs, use the same technique as the social media icons but don't upload all the images into one widget but individual widgets and link each to it's url.

Everything includes psd files so they're editable or you can add extras by modifying the existing elements. :)
You can download the whole step-by-step tutorial here.
You can download the whole zip file for the design elements here.

Have any questions? Drop a comment! Or leave a comment on my Pinterest/Instagram/Facebook!
................................

Meanwhile, pin this and share it if you found this useful. *smile*

Check other design resources here

Lots and lots and lots and lots of hugs,
Nash, xoxo

(And oh yes, check how how the blog design looks over here!)


Friday, February 7, 2014

Inspiration Nation//Transfer images on fabric!

So I've been on this crazy wild chase to get the newest designs from my collection printed on fabric. All was grand and lush till I realized I've never done fabric printing before (painting, sure but printing? Whoa, hold up right there!). So here's your basic tut for printing out those cutesy images you own or have designed like me onto fabric. All you need is a glob of modpodge, wax paper (optional),foam brushes, your fabric and the printed paper the design of which you want to print on your fabric.

Easy enough? Let's get started!


MATERIALS:

Modpodge (matte and gloss)
Printed image (I used Inkjet)
Fabric (any will do. I used white cotton)
Paintbrushes/foam brushes for the modpodge
Sponge
A bowl of water
Wax Paper, optional

INSTRUCTIONS:

1. Begin by laying out the wax paper to protect your work surface from the gooey sticky mess of the modpodge. For the first round, I'm using the matte version of modpodge. Have the image side of the paper facing you and dunk it in a whole lotta modpodge. Do nice, even strokes and you need to put a "thick" layer. When you're done, the colors of the original image should hardly peek through.
2.When you're done, gently lift the paper off the wax paper and put the image side down facing the fabric. The blank side should face you know. Leave this to dry a day.

3. 24 hours later, you should find the whole fabric-image combo stiff because the glue has dried. You'll now wet the sponge with some of the water and gently press down onto the blank side of the image which faces you. Keep dabbing on the water gently until you see the pattern and colors coming through again.
4.Slowly scrub the paper which will come off like shreds and leave a vibrant print behind. Scrape of the entire image (gentle is key, scrape too much and you'll rip off the print from the fabric too!). If you need to, dab the image with water again to make sure it is wet during the whole process.

5.This step is so important and I want you to pay extra effort and attention here. You'll want to make sure that you completely remove off all the tiny bits of paper sticking in there. Rub it all off because if you don't and it dries, it won't be a pretty sight. I overlooked this a bit while printing on mine and I was left with tiny white flecks in some part of my fabric print :(

6.Do a light layer of modpodge (gloss version) to seal it all in, bring out the vibrancy and add a pretty shine. This last step goes that extra length to perk your image up!

And that's it! You can use modpodge meant for fabric and waterproof modpodge if you wish to wash your fabric in the future.
Yes, the color did turn out that vivacious!
(PS: If you can't judge if you removed all the paper, wait until the fabric dries and if it shows off the tiny white specks, wet it again and gently rub them off. Don't apply the modpodge until you do this step because removing them after the modpodge dries clear is pretty much impossible. A lesson learnt!)
This is how it looks from the back. ^
I'll be using this fabric for a very special purpose which I'll share on the blog soon ;) You can check out Craft A Doodle Doo's new hip online shop where you purchase the entire collection of these super chic prints!

Have any queries? Drop a comment below!
In the meantime, share a lil blog love and pin/share if you liked this trick!

You can also subscribe to Craft A Doodle Doo (in the sidebar) for more clever DIYs. You can find me mostly on Pinterest and occasionally on good ol' Facebook!

.......
I bid you goodbye for now with tons of more inspiration at my DIY gallery.
Love, Nash!


Friday, December 20, 2013

Inspiration Nation//Architecture Project Reveal!

Hello ya' all!
For those of you who know that I'm an Architecture Sophomore at college, you may as well be wondering why all that I ever post over here is floral, vintagey feminine DIYs, and freebies, and a few recipes now and then, beauty fixes even...but anything related to architecture? Nope......until, now. :)
This is my final model for the proposal of a French Consulate General. The site area is quite small really, but I wanted to make it iconic, here's the behind the scenes of how I did it.. *drumroll*
First, I made the very basic building design out of smokey grey-brown foamboard. The building isn't in itself complicated, but 1.5 meters away from it, it holds a beautiful aluminum cladding held in place by supports.
For the design of the intricate cladding which was inspired by the Eiffel Tower's cross-net pattern and the famous Arab 'mashrabiya' style, I went to a laser cutting lab with the vector images of the pattern drawn out. The laser cuts through mattboards...

And you get the above result, well not really, (since it was so detailed it couldn't cut all the way through, I had my craft knife come to the rescue!). 

A black acrylic undulating wave frame was then laser-cut and hot glued over the gold pattern.
The supports cut in the same black acrylic were then hot glued at the back,...
And voila!
Look at the beauty! Can we pretty please lemme brag here for a teeny second and lemme say I'm smitten by my own model??
New visitor to the consulate? Please allow me to walk you through the journey ^_^
You are first welcomed through a gate for the consular's main enterance, the secondary gate lies on the adjacent side.
Your left and right alley are laced with beautiful high-rise palm trees....
Upon entering, the same mesh canopy shade lies overhead, walking up the steps, you can see two refreshing water features cascading smooth glassy water jets at both the sides...
Lush green terrace gardens invite you for outdoor lounging lined with trees in full blossom....
A pyramidal skylight filters warm, sunlight into the mass to hint the perfectly blue sky..
Wherever required, my warrior acrylic supports keep my gorgeous cladding in place :)
The pretty woven web cladding filters through a beautiful play of shadows onto the walls and glass windows...
Do you think the building would make the consular and deputy glad?? :)
If the design of the building inspires you, do pin this project so that it clicks through another idea for you in the future!

Join me at Craft A Doodle Doo on Pinterest and Facebook fo' lots more fascinations or easier enough, become a wonderful subscriber! :)

Thank you so much for taking round a trip with me, I feel honored. =)

Lots of love,
Nash

Friday, December 6, 2013

Inspiration Nation//DIY Vintage Storage!

Checklist for things I love:
-Maroons and reds
-Florals
These storage boxes  

My love for everything vintage themed needs no introduction..what can I say...it just, happens :) Anyhow, we had loads of very sturdy boxes lying around in which 'thobes' come in. (know thobes? It's the traditional white garment guys over here put on. But that's not what we concern ourselves with,is it?it's what they come in!).
The best thing about these is that they are super dent-proof, wear for ages and perfect to chuck in craft supplies, no wait....anything!
Here's how I made mine!

Like this? Pin it!

I made a set of three beautifully coordinated boxes. At my local craft store we get rolls of adhesive paper (each for about 2$ approx.). The deep red box has been covered with a velvet textured red adhesive paper. It feels just like velvet but it's actually paper not fabric with an adhesive backing! How cool is that? ...and if you've been dawdling on my humble blog previously, you would have seen how many, many, many times I use these kind of rolls,
              The third box is a glossy adhesive roll with a delicate floral print (for 2$ too) and the first is a thrifted floral pillow cover. (or should I say it took only about half of the pillow cover? :D). The pillowcase set of 2 cost me 2$ which would make this for 0.5$! You just need to scout 'em shelves ladies!
(Click read more to see the full post!) 

Friday, November 29, 2013

Inspiration Nation// Statement Gallery Wall DIY!

I'm sorry new posts on this blog have grown scarce since the past couple of weeks but my final exams are in full swing and I've pretty much been a zombie! If you want to have a look at the projects I've been up to, you can check out my Facebook page! Anyhooooo, I slipped this DIY into my last weekend because it was so simple and easy and perfectly fit in the lil time I could afford for something other than my studies! A DIY statement gallery wall! You can make a ceiling to floor version or a half version. I've got the pictures ready to expand my gallery when my schedule gives me more space to breathe! :)
Are your empty walls in need of a chic vibe?
*_*
The pattern was hand-drawn by me and you can download it at the end of the post. All you need to do is color in to coordinate your room decor! (Oh of course, you color in just once and then just do multiple print outs =D)
If you want yours exactly like mine (because let's see, bright and cheerful rooms attract magnetize you), then just follow the steps below!

WARNING LETHAL : I'm a very messy artist. Please don't be eeked out be my colors going outta the lines!
Here is what your sheet of paper should look like after you've printed it out. I printed mine out on an A4 sized paper
Start by taking a salmon pinkish color pencil and filling in the big buds. Take a medium pink and shade over lines for a little more interest....
Go to the whole flowers and use the medium pink again to start at the base of the petals coloring almost all the way to the end of the petals. Then round off the end with a pretty red color merging into the pink shade..Fill in the center with a mango yellow and shade it with a bit of a mustard color pencil.
Next fill in the curvy round flowers with each of the two orange and yellow. Fill in the centers black as shown!
Fill in the stems with a forest green shade.
Color in half of the total leaves on the entire paper with the forest green. Fill in a sweet minty green in the middle stem of these leaves. Then for the other remaining leaves, do the opposite (i.e fill the leaves with the minty green and do the middle stem a forest green)
Fill in the round berry-like stems with light and dark browns shades. I used dark brown for the fringe-like pattern on the berries.
And you're done!
Scan your colored paper and do multiple copies according to how many rows you want to go across your wall!

You can either frame them (and that'll obviously take longer), or use washi tape as a border to mimic frames, or use washi tape to just tape the top of the pictures to hang 'em!
Next time, I'll do neon washi tape frames. ^-^

....
Here is the finished result!
This table needs a bit more decoration, I think. It's one of the drafting tables I use for my architecture drawings (read :"one of")
Side-view!
I need to finish up the two more rows underneath :)
Here's one to pin!
Here's the pattern to download! >> Free Floral Printable Pattern
..........
If you loved this, then consider becoming a subscriber or hop over at my Pinterest and Facebook page to follow on the fun regularly!
..........
PS: Check out more cool, easy and inexpensive DIYs here in my DIY Gallery!

Love ya' all
xoxox, Nash


FRESH IRRESISTABLE IDEAS...

RIGHT TO YOUR INBOX!

* indicates required

View previous campaigns.