Pages

Friday, October 2, 2015

CRAVINGS RAVINGS // CRISPY CHICKEN TENDERS

One hot and golden afternoon called for another hot and golden beauty: these delicious tenders you see right here! They are beaaaaaautifully crisp and irresistibly tender inside. Unlike so many other versions we know we've all come across, these are not bland at all and are packed with lots and lots of flavor owing to some great spices. All that paired with the most delectable sauce on the side! Now we're talking!

Craft A Doodle Doo - The awesome new fried chicken recipe to try RIGHT NOW! #easy #chicken #tenders

CRISPY CHICKEN TENDERS
Serves: 4 (generously)

Ingredients :

1.Buttermilk (as required)
2.Salt to taste
3.Cajun powder - 1 tbsp for the marinade + 3 tbsp for the coating
4. Onion powder -1 tbsp for the marinade + 3 tbsp for the coating
5.Garlic Powder + Garlic and Herb Seasoning -1 tbsp for the marinade + 3 tbsp for the coating
6. White pepper powder - 1/2 tbsp for the marinade + 2 tbsp for the coating
7.Panko breadcrumbs (YES! You need to use Panko!) (1.5 - 2 cups)
8.Hot paprika -1 tsp for the marinade + 1 tbsp for the coating
9.Cayenne pepper powder/chili powder- as hot you'd want to make it (You can also sub red chili sauce if you can tackle the heat)
10.Sugar - 1 tbsp for the coating
10.500 g (a pound) of chicken fillet slit diagonally into thin strips
11. Oil to deep fry

Ingredients(for the sauce)

-2 tbsp regular mayo + 2 tbsp chili mayo ( I used Heinz)
-1 tbsp regular mustard
-1 tsp honey
-1 tsp garlic powder
-1/4 tsp bbq sauce (optional)

Garnish (optional):
A dash of lemon juice + a sprinkle of parsley flakes
Craft A Doodle Doo - The awesome new fried chicken recipe to try RIGHT NOW! #easy #chicken #tenders

Here's how:

1.Make sure your strips are cut evenly so that the cooking is uniform throughout. Marinate them in just enough buttermilk to soak the chicken. Add in all the spices (in the quantities specified for the marination) to the buttermilk and refrigerate for 3 hours to get the chicken beautifully tender.

2.In a ziplock bag, add the breadcrumbs and all the spices again and the sugar (according to the quantities specified for the coating) and shake thoroughly. Set the pan of medium-low heat and test if the oil is hot enough to fry in by sprinkling a bit of the coating mix in the oil and if it fizzes, we're good to go.

3.Place the marinated chicken (in batches) in the ziplock bag and shake till just coated. Individually place them in the oil and don't overcrowd even if tempted (because that is a sure way to make the coating separate and we don't want that happening, right?)

4.Fry evenly on both sides until golden brown. Garnish with a little drizzle of lemon juice and parsley flakes. Dish out on a pretty paper napkin and serve immediately with the sauce.


Craft A Doodle Doo - The awesome new fried chicken recipe to try RIGHT NOW! #easy #chicken #tenders


You NEED to try this. Let me know in the comments if you do. And don't forget to pin to let other people have a chance to relish too!

Too often, recipes call for flavoring only the coating with spcies but really just season with salt and pepper the actual chicken while marinating in buttermilk or brining. That's fine but if you want a bomb of a flavor, you do not do this. Repeat with me : We don't just season with salt and pepper.

Craft A Doodle Doo - The awesome new fried chicken recipe to try RIGHT NOW! #easy #chicken #tenders

PS: (You can also use dressing like Ranch or French. But do, do, please try out the sauce I put up right here for you. It's a winner, I promise.)

I haven't tried baking these as an alternative to deep frying but if you give it a try, I'm sure they'll turn out just as delicious.
Craft A Doodle Doo - The awesome new fried chicken recipe to try RIGHT NOW! #easy #chicken #tenders

Have a brilliant week ahead. xo

Follow me:


and subscribe :)


FRESH IRRESISTABLE IDEAS...

RIGHT TO YOUR INBOX!

* indicates required

View previous campaigns.

Wednesday, September 23, 2015

THE DECORISTA CHRONICLES // 4 ROOM DECOR IDEAS YOU NEED TO TRY!

Let's start with a drumroll! Four delicious projects you can use to give your room a glam update! These are all whimsical projects which add a classy or dreamy flair and they are all terribly simple. I've gotten inspired by Bando so much recently, decided on buying their gorgeous agenda and while that arrives, I'll make do with some DIY bando themed projects. That being said, Kate Spade is still on my wishlist but her lovely storage boxes are way out of my budget considering all of the other art supplies I'm continually purchasing. That is where Gold Spray Paint comes in - our Xena Warrior Princess for everything DIY and everything Kate Spade inspired.
Craft A Doodle Doo - 4 Chic Room Decor Ideas You NEED to TRY! #easy #chic #room #decor #ideas

We are making everything from dainty bell jars to house your prettiest accessories or craft supplies to hidden hollow book storage that is so cheery it will always put you in a good mood. Next we'll be moving onto dressing your ceiling with some greens that can are easy to install and easy to remove. Great for parties or just for seasonal room decor for a fresh burst of the outdoors :a hanging origami garden! In the end, we'll wield that gorgeous can of gold spray paint, add hot pink and orange accents and with a little help from Ikea, craft some fabulous storage to hide all your treasures in.

Let's get started, shall we?

DIY WHIMSICAL BELL JAR

You'll need:

-An empty glass jar.
We will be inverting this later so make sure there is no text embossed at the bottom of the jar. If there is you might probably have to cover it up with either fabric or wrapping paper. I used an empty tomato puree jar and it was just the right size to upcycle without any text at the bottom.

-A saucer or the lid of a discarded container. I used the lid of a cotton swabs container.

-A ring or a small bauble. You could use a decorative bead or faux pearls

-Heavy-duty glue/glue gun

-Lace or washi tape
Craft A Doodle Doo - 4 Chic Room Decor Ideas You NEED to TRY! #easy #chic #room #decor #ideas

What you'll do:

1.Begin by sanitizing the jar and the lid and then drying it. Next invert it and eyeball the center of the base. Glue down the ring or the faux pearl at the center.

2.If you're using a saucer, skip this step but if you're using a lid then, again, invert it and along the circumference run some lace or washi tape to add a touch of fancy. Additionally you can also spray paint the saucer/lid in a metallic color or neon.
Craft A Doodle Doo - 4 Chic Room Decor Ideas You NEED to TRY! #easy #chic #room #decor #ideas

3.Add in your display items to your new belljar. I think lipsticks would look the cutest as displays. What do you think? ;)
Craft A Doodle Doo - 4 Chic Room Decor Ideas You NEED to TRY! #easy #chic #room #decor #ideas


DIY HOLLOW BOOK STORAGE

Craft A Doodle Doo - 4 Chic Room Decor Ideas You NEED to TRY! #easy #chic #room #decor #ideas

Monday, August 17, 2015

CRAVINGS RAVINGS //SPICY FISH FRY

If you're not an Indian or someone from Asia and can't handle a bit of spice this isn't for you. Orrrrrr....mayyyyyy-be you've been waiting for this recipe all your life to change your opinion on spicy food. I'd just read the other day that eating spicy food triggers endorphins in our system. Is that true? I don't really care. I've only got proof of one thing.

This right here is ah-mayyy-zing.

And don't worry, if you're really all that concerned of steam escaping from your ears then you could tone down the heat. For Indians, this is our regular spicy. I live amidst a sea of Arabs and a lot of my pals just cannot handle even a tiny bit of heat and before they finish even a bite, rush to the basin to gargle it all out.

I mean, c'mon. This shouldn't be spicier than hot buffalo wings though if you're into that sort of thing. Everyone is, right, right?! Enough droning on and on at the intro now. Let's dive into it! :D
Quick and Easy Spicy Fish Fillet: Crusty outside and juicy inside by Craft A Doodle Doo #food #easy #seafood #recipes

Growing up, mum made this hundreds of times on popular demand. Always with a side of tomato chutney and white rice. Bread works wonderfully as well and I prefer mine with bread. Dad and I love ours with freshy squeezed lemon on top of the fish's crusty exterior. Yum. You'll want to make sure you have good quality fish fillet for this otherwise it would ruin the whole experience. That's always the case with fish, isn't it?This dish would be made exclusively on Fridays at our place. I think that made it more special. Heck, I could eat this non-ceremoniously past bedtime and it would still feel special. Want to be made felt special? Here's how:

SPICY FISH FRY
Succulent bites with a kick
...............................................

Cuisine: Indian
Serves: 4

Ingredients:

-500g fish fillet
-1 tsp red chili powder
-3/4 tsp green chili paste (or blend up a paste of 3 tbsp coriander/cilantro leaves and 2 green chilis)
-1/4th tsp turmeric powder
-1 tbsp ginger garlic paste. (You can also sub 50:50 of finely grated ginger and garlic)
-1 tsp coriander/cilantro powder
-1/2 tsp garam masala powder
-A pinch of ajwain (Carom seeds in English. You can sub oregano instead)
-Salt to taste
-1 tbsp lemon juice
-Vegetable oil for deep frying

For garnishing:
-1 tbsp chopped coriander/cilantro and mint leaves + Lemon wedges

How to:
1. Wash the fish fillet and cut it up into medium sized chunks (2-3 in.)
2.Marinate the fish in all the ingredients except the oil and set aside for an hour in the fridge.
3.Heat the oil in a non-stick pan and fry the fish on medium heat until golden-brown on either side.
4.Drain on a paper towel and serve hot garnished with coriander, mint and lemon wedges.

And there you have it. Congratulations. You've just pampered yourself like the true princess (prince?) that you are.

Quick and Easy Spicy Fish Fillet: Crusty outside and juicy inside by Craft A Doodle Doo #food #easy #seafood #recipes

If you liked this recipe don't forget to pin and share. Thank you for staying with me in this little rave session. And oh oh, I'm doing a new DIY round up of some of the prettiest room decor projects I've been curating. Stay tuned for that (it's taking longer than I thought) and if you're curious, you can follow along the behind the scenes of those on my Instagram page. It's a lively little place to visit. :D

Have a look at my other recipes here. Biryani anyone?

Follow me xx


And subcribe below!


FRESH IRRESISTABLE IDEAS...

RIGHT TO YOUR INBOX!

* indicates required
View previous campaigns.

Wednesday, July 29, 2015

BEAUTY IN A NUTSHELL // MEGA EDITION- 18 BEAUTY PRODUCTS REVIEWED!

Ah, a mega-edition of beauty product reviews! If you've ever read half a dozen reviews in one post this is the mother of them all and they are especially helpful to those like combination skin like mine.While scanning my earlier blog posts I've noticed how I haven't done a product review in ages which is mental because I think I'm in love with all the great deal of things I've gotten recently either as part of a haul or some awesome people in my life gifting them with reckless abandon, haha. You'll be delighted to know that none of these products are sponsored and my honest head-over-heels in love reviews. So let's start darling, shall we? ;)

10 Beauty Product Reviews MEGA-EDITION -Products combination-skinned girls will love! #beauty #skincare #products #combination #skin #reviews

Here's an overview of the products (in order of how they appear in the post) reviewed:

1.Makeup
   1.1 Base Makeup
       -Mac Studio Fix Powder Foundation
       -Maybelline Dream Satin Skin Powder Foundation
       -Lakme CC Cream
       -Mac Studio Finish Cream Concealer

   1.2 Lip products
      -Forever 21 Love&Beauty Lipstick

   1.3 Eye Products
      -Dior 5 Colors Eye Palette in 566 Versailles
      -Barry M Eye Pencils in Bronze and Green
      -Bourjois Contour Clubbing Eye Pencil

   1.4  Makeup Palettes and Tools
       -Forever 21 Makeup Brush Set
       -Lancome Absolu Voyage Travel Palette

2.Skincare
   2.1 Bath and Body Works Moroccan orchid and Twilight Woods body mist
   2.2 The Face Shop Real Nature Face Masks
   2.3 The Face Shop Aloe Gel
   2.4 Beesline Face Masks and Scrubs

Thursday, July 16, 2015

RAMADAN SPECIALS // FREE PRINTABLE EID-UL-FITR CARD

A quickie for a post today. I know we're all delightfully busy prepping our homes for the big day tomorrow and you'll be having tons of guests coming over or may probably be going as a guest yourself. Here's to showing that little extra affection all our loved ones deserve; print this out and gift it alongside that lovely box of chocolates and you're all set for a beautiful time!

Free Printable Eid Card by Craft A Doodle Doo #eid #printables #free #cards

DOWNLOAD THIS BEAUTY HERE ;)


If you're looking for envelopes to download or more pretty prints don't forget to check out my Freebie Gallery.

If you wish to share the printable digitally, please be a darling and credit back to Craft A Doodle Doo.

Follow me xx

A very blessed Eid to all my dear brothers and sisters worldwide and lots of love,
Nash


Friday, July 3, 2015

RAMADAN SPECIALS // FREE PRINTABLE DUAA CARDS

I know we all have plenty of reminders in this precious month everywhere to be more mindful and grateful of everything we've got so I've quickly created a pretty printable duaa card for my Muslim sisters to glance at everyday and memorize this super-beneficial duaa. This particular duaa card has the Syed-Ul-Istighfaar and its transliteration on the front side and the English translation on the back. Reading through the English translation makes this so much easier to memorize.

For those unfamiliar with this duaa, the Syed ul Istighfaar is the best supplication for seeking forgiveness. And just because we are always helping each other out here, the design of the card makes sure that others will adooooooore receiving it as a small thoughtful gift too!
Craft  A Doodle Doo // Ramadan Specials free printable dua card #free #printable #ramadan #floral


How to: Paste the front print onto one side of cardstock and the back onto the other side. When gifting to someone, hand it over in a colorful envelope. I have lots of envelope prints available in my freebie gallery if you need some help in that department!

I would love it if you share this printable on social media as well but don't forget to link back/redirect to my site or give credit. Thank you. :)

Bonus tip: You can also keep this as your phone's screen saver to keep reviewing it. :)
..............

PS:Get updated on soon-to-be-coming cards by following me:


Lots of love and a have a blessed Ramadan,
xoxo, Nash


Wednesday, June 24, 2015

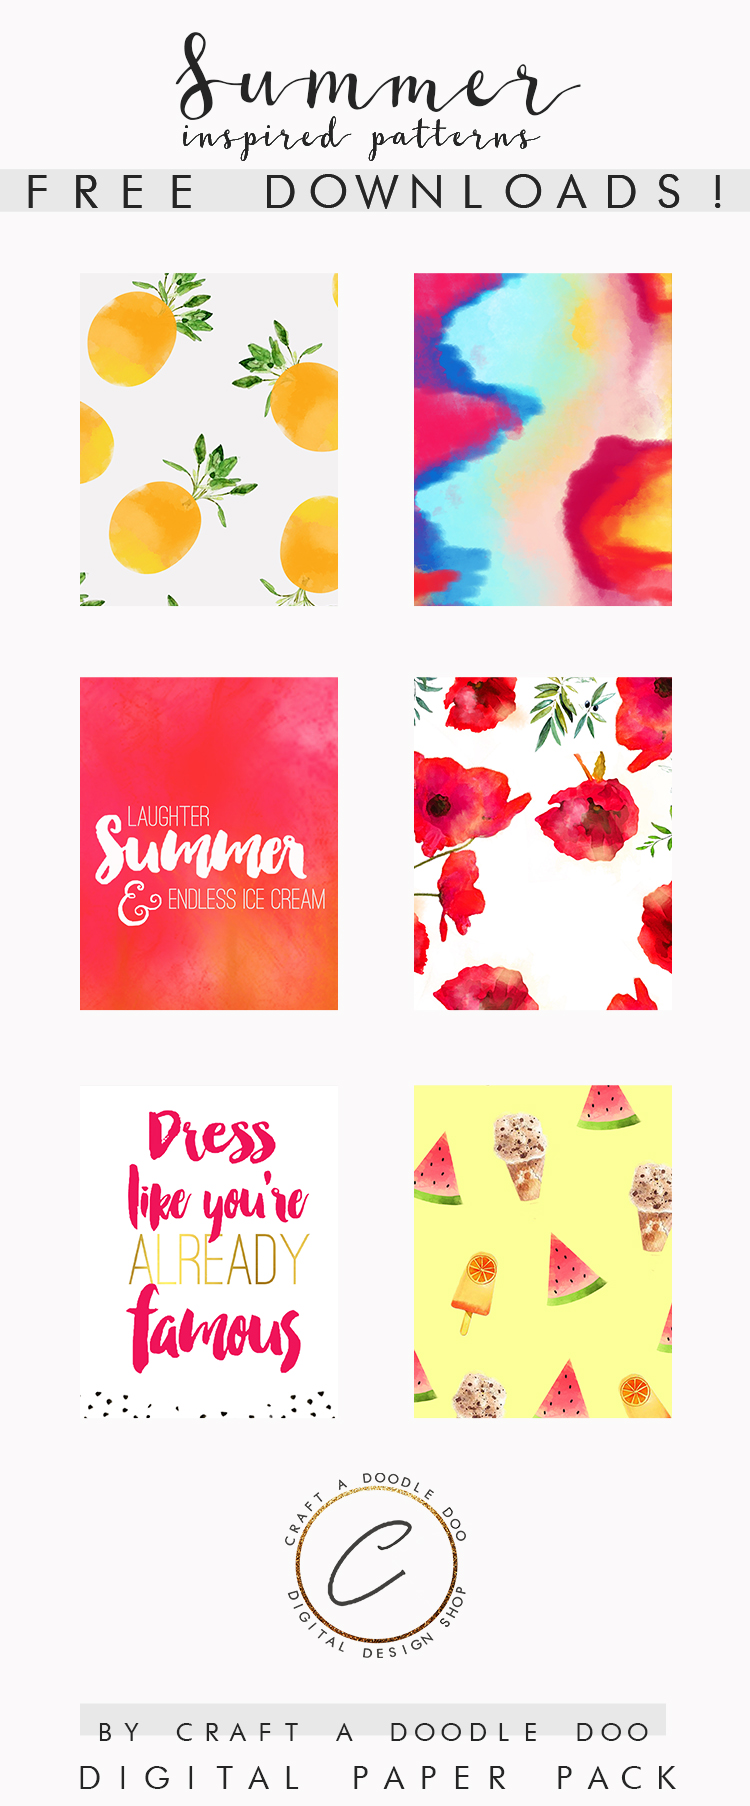
6 NEW SUMMER DIGITAL PRINTS (SHADOWS OF SUMMER COLLECTION | DIGITAL PRINTABLE PAPER PACK)

It's been the longest time since I've written and it came with this huge  realization that while I absolutely adore blogging and everything so rewarding about it, being in an Architecture major had ultimately taken toll on me, all the more now since I've gone into Senior year. On a happier note, my big break off blogging to focus on college turned celebratory in the end when I found myself gaping at a 4.0 GPA. (At our college, the highest GPA you can get is 4, not 5). 
         So that was a summarized explanation for what kept me from blogging luscious freebies and DIYs here. Now that vacay started, I'm back to business. Summer is in full swing here (we're hitting 45 degrees Celcius on average) and nothing spells summer and chillin' like lots of bright colors, cheery florals, fruity prints and popsicles!S
6 Pretty New summer themed free prints by Craft A Doodle Doo! #free #printables #summer #design


This collection packs in all that summer action into 6 peppy prints available for digital download. You can use them for scrapbooking, frame them up as art , as wrapping paper for gifts or to to jazz up your DIYS! 

Here's a preview on what you'll get on downloading:
6 Pretty New summer themed free prints by Craft A Doodle Doo! #free #printables #summer #design

The download is a compressed file (.rar) so you'll have to extract it. If you're having any issues, please drop a comment below and I'll get back to you as soon as I can!


PS:For my subscribers, I'll be sending out some exclusive brush-lettering prints soon to your inbox which, as we all know, are completely in vogue right now. Set them up as mobile/desktop wallpapers or-r-r-r frame them! They'll look absolutely witty either way.
6 Pretty New summer themed free prints by Craft A Doodle Doo! #free #printables #summer #design

Here's some inspiration on how to use these digital prints:
2.These adorable cubby shelves
3. These ideas on designing your own stationery
4. These super-fun made from scratch on the go notepads.

.................................

Pin this post!

Free Shadows of Summer Digital Paper Backgrounds by Craft A Doodle Doo | Scrapbooking and Planner Printables Patterns Pack #freeprintables #freescrapbookingfreebies #summerprintables #colorfulpatterns #freeplannerprintables #freesummerprintables #summerdesigns

SHOP OTHER PRINTS AND PATTERNS PERFECT FOR ALL YOUR CRAFTY AND DESIGN PROJECTS ON MY ETSY STORE!


Don't forget to pin and share this if you liked it and have a brilliant summer. xoxo


.................................


Psst...Follow me and never miss an update!

Nash
-CRAFT A DOODLE DOO-


Friday, April 10, 2015

ON MY WISHLIST: SPRING THEMED PAPERIE FROM MINTED!

If you've been a visitor at my cute lil blogging niche before you'd know that I love graphic design myself and keep bringing up freebies,tips and designs for my just started out shop. Fellow graphic design lovers would agree with me that we are on the constant lookout for inspiration and when I saw this beautiful book on Rachel's instagram feed here, I was instanly swooning and the next day almost as if a prayer had been answered Minted came to the rescue.

If you haven't heard of them before, they're the fantastic people over at Minted.com who make some gorgeous paperie, home decor, party decor, art prints and so much more by the most trendy designers you've seen around in the field. I quickly found out after some childish rummaging on their site that the notebook on Rachel's feed I was smitten by was actually from Minted.

And then a love story began..... 
ON MY WISHLIST: Pattern Inspiration; Spring themed paperie from Minted #weddings #party #events #art #inspiration


CARDS IN THE PICTURE
TOP TO BOTTOM: Hand Painted florals on Kraft card  . Rose gold and copper rustic cardCoral background card . Hand drawn roses card . Bright and colorful florals card

I continued exploring all their categories and got so excited that I even showed them to my dad and he loved them too. For reference, my dad is a senior architect and I am an architecture student myself, so spotting good design is our forte and this totally hit the top spots in the chart.
If you've got yourself tied up with an upcoming function you can't go wrong with their Save the Date cards. They have a host of colors to match your design palette. Or if you haven't chosen a color scheme yet you could go choose one at the Design Seeds. Then return back here and explore the plethora of options. And yes, they are for all genders and preferences that can be customized as well; it's dizzying!

I'm currently head over heels for their botanical prints. Needless to say they will also serve as inspiration for my upcoming blog projects. And since spring is here, no one can complain of too many flowers.

PS: There's no such thing as too many flowers for me, haha!

They also have a ton of art prints if you are in a wall decorating phase now. If you're too paranoid to have your accent wall repainted or wallpapered you can always go with a mix of beautiful prints.

And if you're not the paint-it-yourself type, and that's a good bunch out there, then these are perfect for you. I've found out two things in these designs that I'd like to incorporate in my designs too: their simplicity and their character. You don't often come across design that is simple but upholds major character at the same time.
ON MY WISHLIST: Pattern Inspiration; Spring themed art prints from Minted  #interior #decor #art #inspiration

PRINTS IN THE PICTURE:
Falling leaves . Pining For Pineapple . Tangerine . Moth . Tulip and Tracery . Indigold . Grecian Floral

The prints speak for themselves, don't they?
You can order them in the size you fancy most and the kind of frame you need. I love how they play with perspectives sometimes. Noted. :D

And here's a cute DIY tip, no one says art prints are just for walls. If you already have a lot going on your walls, and would like to amp up your coffee/dining table or studio table, then display these prints (in the smalled sizes) underneath a glass table top so that you can whistle over them as you work.

Their art prints and save-the-dates are printed on high quality paper, so you know you'll get some super-rich pigments to adore. I've also looked for what other people are saying and everyone is delightfully impressed!

I'm going to order myself some of their paperie, journals especially since I'm such a journal fanatic right now. Check the creatives out and let me know if you're a sold as me! If you are a fellow creative I bet you would. :D

***
DISCLAIMER: This is a sponsored post and I'm getting some Minted credit in exchange for my time and review. All opinions like I stated before are from my good ol' design and architecture oriented self and my architect-dad approved as well. So there's no kidding.
***


Follow me for inspiration injections:

Take care, xoxo
Nash


Saturday, March 28, 2015

INSPIRATION NATION // DIY ORIGAMI FLOWER CURTAIN

First off, I haven't yet decided where would be the perfect setting for this craft project to revel in full glory. My initial idea was to use it as the title puts it, a flower curtain. I had fantastic visions of friends walking in and recognizing this from one of the many snapshots that I sent them of my behind-the-scene crazy woman workings. But then while I was actually photographing the whole thing, it occured to me that it would pose as gorgeous replacement of a bed's headboard. That's positive though right? The fact that I'm unsettled about where to hang this curtain is what makes it so flexible. So use it at a whimsical party for your girlfriends, for your little girl's room or to add that tipsy dimension of fantasy to your own bedroom or workspace. This is bound to look ravishing!

Espcially when people notice they are not real flowers and that are so, so many origami flowers strung together lovingly by you in hopes that you could transition yourself back to when you could wear as many tutus and tiarias as you'd want in a day.

We could still do that though. I know I could!
DIY Origami Flower Curtain: for a whimsical spin to your decor @ Craft A Doodle Doo #diy #tutorial #decor #ideas


The kind of origami roses I used for this project are a little different than the normal origami rose tutorials. The toughest rose being called the Kawasaki rose even of which they have several versions. We also have a standard rose. But I chose a simpler kind for this project which looks equally pretty and it's called the Bird-Base Rose or the Twisty Rose because the entire effect of the rose comes from twisting the folds at the end.

You could use any light-weight craft paper for this. Since it's Spring, I specifically chose pastel colors from a huge bundle of colored A4 copy paper. I also made the roses in two different sizes to add a little visual interest and alternated the colors between pink and yellow.

You could leave out the leaves but then if I were you I'd think hard on that one! The leaves are so easy as well, the only setback being the project is time-consuming. But think of having a gatehring of friends, maybe pizza-delivered at your doorstep, chilled summer drinks,humming your favorite tune and voila. you wouldn't even notice you just made 24 roses and 48 leaves. At least that's as many as I made. :)

Saturday, February 14, 2015

INSPIRATION NATION // DIY STYLED PHOTOS!

Styles photos are all the rage these days on blogs and websites which want to be seen as more chic and professional and certain people have jumped on the bandwagon to make big sales out of creating stock photography that's truly eye0candy! Not to bash those amazing brands doing all the people who're short of time or maybe not so experienced with the camera a stunning benefit  but...wouldn't it be so much better if you could make your own styled photography? If you're an owner of lots of pretty baubles, have a good eye for photography and this manual at hand, it's no biggie! I'll give you a plentiful list of tricks to do those gorgeous styled photographs and be a master at it!
Create your own Styled Photos! Styled photos are all the rage now, learn how to snap these beauties on your own @ Craft A Doodle Doo onceuponherdream.blogspot.com


This article features 10 fool-proof tips to get those styled pictures everyone craves! Don't forget to share and... to thank YOU. for going through my tidbits of wisdom, I've even got a free surprise at the end of the post!


1.Choose a theme.


You can't get the best out of styled photography without choosing a theme.I don't mean any rigid constraints with the word "theme". It could be a color theme. Or a seasonal theme. (If you're choosing spring, you could go with a selection of lots of pastels. If it's summer you could choose something bright and fruity. If it's a winter theme you'd like to go for, you may wanna shift to more cooler tones like blues and purples in your photographs). In addition you could also choose a topic based theme: I've compiled a collage of some popular ongoing themes for styled images: take a look at this ridiculously beautiful styled pictures!

1) Beauty/Outfit/Accessories potpourri


Styled photos are all the rage now, learn how to snap these beauties on your own @ Craft A Doodle Doo onceuponherdream.blogspot.com

1.Connie Cao @kisforkanithelabel 2.blushshop @blushshop  3.Nat @n4tic  4.Raffaella @raffaellferrigno 5,Jenny Jovanovic @crazystylelove 6.lenie @lenieloves

2) Breakfast and food, tantalizing food!

Styled photos are all the rage now, learn how to snap these beauties on your own @ Craft A Doodle Doo onceuponherdream.blogspot.com

2 & 3. Maimona Jamal Badi @dreamy_touch 7.Utosh @ utosh  5.Princess inspiration @ princessaddictions 9.@cathycouture

3)That dre-a-a-a-my workspace.

Styled photos are all the rage now, learn how to snap these beauties on your own @ Craft A Doodle Doo onceuponherdream.blogspot.com
4,5,6 & 7 Jessica Clinch @simplyjessicamarie 9.blushshop @blushshop

2.Choose a carefully thought out background in relation to your foreground objects and props


If you have a careful look at the pictures above you'll see there's a variety of backgrounds, from plain to textured with wood, marble or even glass (in the workspace collage). Neutrals backgrounds like these are always the best bet to add that little something that's so important because it holds the entire picture together. You'll wanna make sure your background is not overpowering but if you'd like to choose a bright, fun background, go to the next point..which is...

3.Contrast, contrast, contrast!

It doesn't just have to be between colors, it can be between materials too: pair hard rough wood with soft, flowy textiles. Monotoned marble with bright colors and on and on.
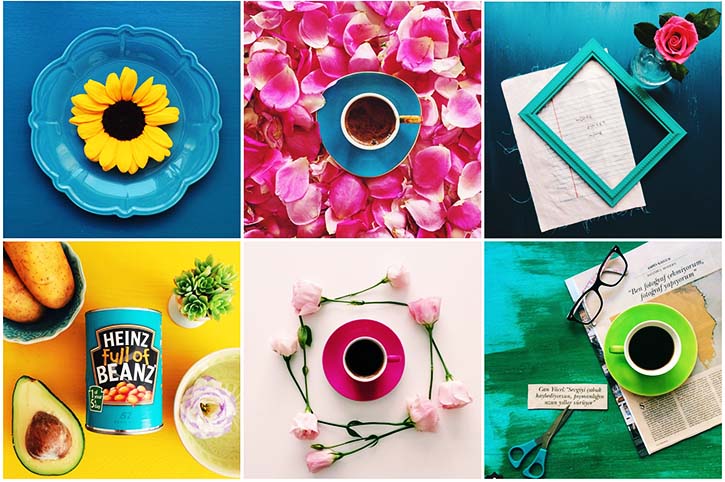
This account on Instagram (@zynp) is what made me believe that while it's tricky to have a bright background against bright colorful objects, if done right, the results can be stunning. You'll need a bit of practise for this but here's one tip: Look for the opposite colors on the color wheel to pair or colors within/around the same color family. Think berries with blush pinks or colors normally found together in nature: woody browns and deep greens; and keep the contrast in couples: stark blue background against juicy orange foreground objects or the the likes. (so that's just two colors: blue and orange but so much to swoon over!)

    (Zeynep Albayrak) @zynp on Instagram, she knows what she's doin'! Go ahead & follow her!
Styled photos are all the rage now, learn how to snap these beauties on your own @ Craft A Doodle Doo onceuponherdream.blogspot.com


4.Layering


Layering gives so much more dimension and depth to what could otherwise be flat photography and that which lacks in character. Try layering with different napkins that fit in your theme, maybe cutting boards, textiles (the more frayed, the better), scrapbook paper, giftwrap, pretty books,place-mats or even shimmery bling!

Styled photos are all the rage now, learn how to snap these beauties on your own @ Craft A Doodle Doo onceuponherdream.blogspot.com
1.  Jenny Jovanovic @crazystylelove  2.Nash (@candygloss006)  3.Nash (candygloss006)


5.Fluidity


Sometimes if your object looks too static, you could use a bit of dynamism in the picture. The best way to add this may be a crumpled sheet in the background (maybe a picture of breeakfast or five-star dessert in bed?) that signifies movement had taken place or even a scarf in a vibrant color sprawled across the picture's width or height. You choose. This isn't always necessary but see if it works for you. When it works, you'd immediately know because the picture suddenly gets a whole lot of oomph.

Styled photos are all the rage now, learn how to snap these beauties on your own @ Craft A Doodle Doo onceuponherdream.blogspot.com
1 Zeynep Albayrak @zynp 2. Nash @candygloss006 3.Melissa @milkthistles   4. Zeynep Albayrak @zynp


6.The human touch  


This is another optional. You might want to add a slight part of your hand going over the keys of your laptop. Or maybe fingers curled around that beautiful coffee mug. This adds so much more dynamism and relatability!

7.The little details


There's the big focus of your picture, and then..there's the little details and the props that just kick it up that extra notch. This could be anything from sprinkles thrown in around your cake (yes, around!) or confetti sprinked in around your stationery. Or maybe some delectable macarons placed by your current favorite novel. They don't have to get the spotlight, but they sure do make a difference.


8.Doodles and lettering


Adding doodles and lettering is completely in vogue right now. So if there's a little too much of empty space that shows up in your photo, try adding a bit of doodling or lettering overlays. There are so many apps for this.Apps I use for Android include Doodlesnap, Photofy and Shii Overlays.


9.Never stop looking


Don't ever make the mistake of thinking you have enough inspiration. Get started, yes, and do what you need to do but always keep looking for more. Coffee shops and bakery shops do such beautiful styling; it's hard not to get inspired. And so do glam decor editorials. I usually pick up inspiration from Pinterest and Instagram. (To see which boards I usually follow on Pinterest and Instagram, follow me from the sidebar!)

         You can like a picture on Instagram and it will instantly get saved by default in your profile (you can access all the pictures you keep liking through the settings menu on the app.) The problem here is: if all the pictures you keep hitting like for pile up in your account, it does away with some of your earlier liked ones to accommodate space for the newly liked pictures. To bypass that nuisance, download an app that saves pictures/vids from Instagram and use to to constantly save those pictures on your gadget. I use Instasave for Android if you were wondering. :D

9.Try not to be a perfectionist


Sometimes Instagrammers put all those beautiful pictures out there, it's easy to be caught in that culture where everything needs to be poetically set up. I need to tell you that even if those tricks above are for significantly improving your styled photography, sometimes it's good to leave things messy, untended to or to show flaws. After all, a little embarrassment brings in more friends than appearing impeccable!

And here's your surprise: Three high-resolution styled photos you can include in your website/blog promotions or themes! If you do happen to use any of these, don't forget to drop by and let me know so that I can have a look as well! :D

                                         
PS:I've tried to link back as many Instagram photos to their accounts as possible which was a tough job. If you find one of your photos here and I haven't listed you please let me know so that I can title the photo to the correct owner. If anyone of you would like me to take their pictures down, please contact me via email. Thank You. :)


And now folks, a few examples of using styled photography for beautiful branding, magazine layouts and even opt-in boxes!

Styled photos are all the rage now, learn how to snap these beauties on your own @ Craft A Doodle Doo onceuponherdream.blogspot.com

1 deluxemoderndesign.com    2.assets.lookbookpro.com   3.rosemarywatsonproductions.com 4.shaycochrane.com 5.lauradrayton.com


Need another article to pump up your lifestyle blog? Have a skim through my "Secrets to writing killer DIY blog posts" article here!

You can also download and print many freebies in my freebie gallery (in the nav bar) to primp up your photos! Orrr....check out my shop if you'd like to print papers for uploading images on commercial sites.

AND LASTLY, PIN AND SHARE THE FUN :)
Follow me xx,


Nash

FRESH IRRESISTABLE IDEAS...

RIGHT TO YOUR INBOX!

* indicates required
View previous campaigns.

Thursday, January 29, 2015

THE DECORISTA CHRONICLES// DIY PAPER TULIPS!

I simply adore tulips! It's a rarity here to ever get to buy some because roses are the conventional go-to flowers here when it comes to fresh decor so I thought of making a bouquet on my own. These are so easy to make, just four steps and you're done! Not to forget no watering required! Cover the stem, cut out paper strips, fashion them into petals and wind them around the stem!

If you're looking for an quick evening of gorg paper flower creations or a cute diy floral bouquet to gift to someone with a special note, give this one a try! I'm sure they'll send the significant other in fireworks!

DIY Paper Tulips- These add such a vibrant pop of color to any room and are great as gifts, not to forget, you'll never need to water them!

Crafting tulips can be slightly trIcky since they are more bulbous at the bottom and tapered at the apex but this is the lazy-girl's guide and we're always looking for shortcuts, aren't we?

Here's mine:

DIY PAPER TULIPS


DIY Paper Tulips- These add such a vibrant pop of color to any room and are great as gifts, not to forget, you'll never need to water them!


You'll need:

-Very light-weight colored paper on the flimsier side so that the petals fluff up and look more ruffle-y (You can even start with white and dye it later so it looks more natural). Mine is hot fuchsia.

-Florist's wire. If you've never done flowers before you may use regular wire or pipecleaners or even wooden skewers (but they'll give a stiffer look to the stems)

-Green duct tape/washi tape/florist's tape to wind around the stem.

-Some cotton for the "centers" of the tulips.

-Scissors, glue, a ruler and a pencil.
DIY Paper Tulips- These add such a vibrant pop of color to any room and are great as gifts, not to forget, you'll never need to water them!


How-to:

1.You'll first need to cut your wire to size for the stems and wind them with whatever kind of tape you're using. Don't cover the entire length and leave a little at one end and turn it over itself forming a loop.
DIY Paper Tulips- These add such a vibrant pop of color to any room and are great as gifts, not to forget, you'll never need to water them!

DIY Paper Tulips- These add such a vibrant pop of color to any room and are great as gifts, not to forget, you'll never need to water them!

2.Dab a little glue here (on the loop) and press over the cotton covering the wireframe we just made entirely. Cut a 1.5 inch. by 1.5 inch square and wrap it over the cotton and secure with glue so that it's completely covered.
DIY Paper Tulips- These add such a vibrant pop of color to any room and are great as gifts, not to forget, you'll never need to water them!


3.Here's the fun part. I had an A3 sized colored sheet so I folded it in half and drew the dimensions of the strips around 2x5 inches. Draw lines using a pencil and a ruler demarcating each strip and cutting them out. You'll need six of these dimension-ed strips per tulip.

       Since I'd folded my paper beforehand, when I cut one strip, I ended up with two.
DIY Paper Tulips- These add such a vibrant pop of color to any room and are great as gifts, not to forget, you'll never need to water them!

DIY Paper Tulips- These add such a vibrant pop of color to any room and are great as gifts, not to forget, you'll never need to water them!

You'll then fold each strip on half to make a crease and unfold it. Then twist the strip scrunching it along the middle. This gives both halves of the strip the curvature of a spoon (which we are aiming for) and thennnnnn fold the bottom half over the top half.
DIY Paper Tulips- These add such a vibrant pop of color to any room and are great as gifts, not to forget, you'll never need to water them!

DIY Paper Tulips- These add such a vibrant pop of color to any room and are great as gifts, not to forget, you'll never need to water them!
 After you've done that, snip off the squarish frame of the petal in a curve to make it's perimeter more rounded.

DIY Paper Tulips- These add such a vibrant pop of color to any room and are great as gifts, not to forget, you'll never need to water them!

4.To adhere the petals around the center and aim for the more bulky part at the bottom, wind the first three petals taking the narrower part of the triangular petal shape as the top of the petal and the wider traingle base as the bottom of the petal. Then for the next three petals, adhere them around successively as inverted triangles. (Base of triangle as top of petal and narrow part as bottom).
DIY Paper Tulips- These add such a vibrant pop of color to any room and are great as gifts, not to forget, you'll never need to water them!

And we're done! Just fluff up the petals and play around with the shape a bit so that the petals look more tapered at the top and puffier at the bottom. If you'd like to add leaves, cut oblong organic shapes and twist the ends gluing them to the stem. I just ran out of paper to do that. :^(

DIY Paper Tulips- These add such a vibrant pop of color to any room and are great as gifts, not to forget, you'll never need to water them!

TIP: To add a fancy punch, I used a polka dot envelope and folded it into a cone and wrapped it around the tulips. I'll be writing a special note on the cone's interior as a special surprise. So if you're gifting this, that's something you can do to brighten up their day Sherlock Holmes style. 
DIY Paper Tulips- These add such a vibrant pop of color to any room and are great as gifts, not to forget, you'll never need to water them!

Enjoyed this tut? Pin and share it! (because we all know pinning's hot!) Want to get hold on more DIY tuts? Check out lots of fun ideas in my DIY gallery below. If you're on the lookout for freebies, printables and giftwrap, I have that too!


Stay up to date as I'll be sending out January's freebie in a couple of days to all my subscribers, so if you haven't subscribed yet, take a chance! :D


         **********************************
Adios Loves, xoxo
Nash


FRESH IRRESISTABLE IDEAS...

RIGHT TO YOUR INBOX!

* indicates required
View previous campaigns.